As you can see, I've been making good progress on Cinders. I'm looking forward to finishing the filling patterns so I can start the outlining. Right now, the blackwork sections all kind of blend together.
I haven't stitched the vest or the "coal scuttle". (As an aside, in class I kept referring to this as "the bucket", and Marion corrected me, until I heard her mention "the bucket". :-) ) Since I've changed the color scheme, I can't quite figure out what colors to put in these areas. I'm open to suggestions, if anyone has them.
Join me in my exploration of the world of needlework! Threads and fabric combine in so many ways - but it's all "just string".
Monday, April 28, 2008
Wednesday, April 23, 2008
Happy Dance: The Long and the Short Of It
What a fun, yet challenging, beginner soft shading project! I really enjoyed this. At first, I had problems keeping the floche twisted correctly, but it was so nice to work with once I remembered to keep an eye on the twist. The thread has a very smooth finish, so it has a wonderful sheen, particularly when used in satin stitch. I'm going to have to find ways to use floche in other projects!
Thank you to Marion Scoular for an enjoyable class and a quick, yet effective, teaching project!
Cinders, Day 2
After yesterday's post, M&Co asked,
For the second day of class, we tackled the outlining of her skin in split stitch, started the outline stitch for her hair, and discussed outlining the patterned areas. These outlines will be done last, so we can match the weight of the outline to what's inside. Heavier patterns will get heavier outlines.
I made a bit more progress yesterday, and picked the patterns for most of the larger areas. By adding a few more stitches to the pattern of the smaller stones of the archway (as compared to the top-most stitched small stone), they are visibly darker than the larger ones. The top small stone looks like a mistake in the pattern. The pattern in the other two make it obvious that these are supposed to be different.
What is the name of this class? Is this one of the fairy tale series?Please allow me to apologize for not stating this up front! Yes, this is one of Marion's fairy tale designs. It is Cinders, dressed in rags before her transformation. There is a partner design, Cinderella, showing her running away from the ball. If you're not familiar with Marion's other fairy tale designs, she also has The Princess and the Pea, Rapunzel, Hansel and Gretel, Jack and the Beanstalk, and The Bremen Town Musicians.
For the second day of class, we tackled the outlining of her skin in split stitch, started the outline stitch for her hair, and discussed outlining the patterned areas. These outlines will be done last, so we can match the weight of the outline to what's inside. Heavier patterns will get heavier outlines.
I made a bit more progress yesterday, and picked the patterns for most of the larger areas. By adding a few more stitches to the pattern of the smaller stones of the archway (as compared to the top-most stitched small stone), they are visibly darker than the larger ones. The top small stone looks like a mistake in the pattern. The pattern in the other two make it obvious that these are supposed to be different.
Monday, April 21, 2008
Cinders, Day 1
Direct from a hotel in Corning, NY, I present the pathetically minute amount of stitching from my class today! That's right, folks, I stitched a whopping three stones of the archway and a little bit of the hearth between the broom and Cinderella. Oh, and a doodle in the corner.
This class is turning out to be more challenging than I expected. Actually, I should say it's adaptable to the level of the stitcher. It's a beginning blackwork class, and can certainly be done as a copy of Marion's stitched piece. It can also be much more challenging - not in the stitching itself, but in the finding of appropriate patterns for each area.
Marion has provided 15 pages of various filling patterns. I'd guess there are over 200 patterns in all. (For the record, many, if not most, of these are NOT reversible. Blackwork does not have to be reversible.) We're finding patterns that are appropriate in scale to each area. We're then shading them by adding or deleting stitches, changing the color value of the thread, and/or changing thread thickness in some areas of the pattern. By clicking on the picture and looking at the three completed blocks in the archway, you can see a bit of this. The two larger blocks are in a lighter color and are missing some stitches. I'll probably use a similar effect on the inside and outside of the bucket.
In the hearth, I've stitched some basting lines. These will be used so I can tell when I want to change colors within that large area.
I'm going to learn a lot in this class. Most of my blackwork background has been with reversible bands (as in Tiramisu). This is the first time I've worked with shading blackwork, and so far it's been a bit frustrating (like when I tried a pattern in a certain area only to find out it was far too big for that area, or when I tried to make a complex pattern reversible just to see if I could).
I just realized it. I've been doing a LOT with shading lately, between Winds of Color and these two classes with Marion. Apparently, if last year was the year for goldwork, this year is the year for shading. There are three very different techniques: canvaswork, surface embroidery, and blackwork, but they all require many decisions for shading. It's wonderful to know there's always something to learn in this fascinating needlework journey!
(Isn't it fun when a blog post doesn't end up the way you thought it would? This in itself is part of my journey - helping me find the parallels in my projects. I might not have made the "shading" connection without writing about it!)
Sunday, April 20, 2008
The Long and The Short Of It, Day 2
Saturday, April 19, 2008
The Long and The Short Of It, Day 1
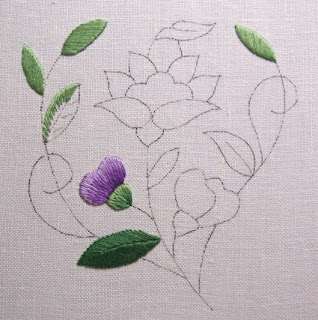
This weekend's class with Marion Scoular is a shading class called The Long and The Short Of It. This piece is small; only about 5" across. Today we covered satin stitch over a split stitch outline, satin stitch leaves with a center vein, and regular long-and-short stitch. As shown in the photo, in class today, I finished 4-1/2 leaves and one flower bud. Tonight I'm going to continue to work on the leaves.
In addition to the stitches, today we also learned about the thread we're using: DMC Floche, a five-ply thread that is wonderfully round and smooth. It's got a wonderful sheen because it's twisted with so many plies. Marion told us about her crusade to correct the misuse of the terms ply vs. strand:
Maybe I'll start a stitching lexicon to keep all of the various stitching terms straight. Unfortunately , Blogger doesn't provide the ability to have specific linked pages (unlike some of the other blogging programs), so I can't start a page specifically for the lexicon. For now, I'll just create a new label of "lexicon" for this post and others with stitching definitions.
In addition to the stitches, today we also learned about the thread we're using: DMC Floche, a five-ply thread that is wonderfully round and smooth. It's got a wonderful sheen because it's twisted with so many plies. Marion told us about her crusade to correct the misuse of the terms ply vs. strand:
- A ply is part of a thread that cannot be separated. Most threads are two plies twisted together. Floche is five plies twisted together. You wouldn't normally stitch with a single ply.
- A strand is a single stitchable unit of thread. Several strands may be grouped together to make the thread easier to package.
Maybe I'll start a stitching lexicon to keep all of the various stitching terms straight. Unfortunately , Blogger doesn't provide the ability to have specific linked pages (unlike some of the other blogging programs), so I can't start a page specifically for the lexicon. For now, I'll just create a new label of "lexicon" for this post and others with stitching definitions.
Friday, April 18, 2008
Jewel tones and a visiting teacher
Somehow this week, I let three days go by without a single stitch. I can't tell you the last time that happened!
Tuesday evening, I went to the movies with my mom and sister (Miss Pettigrew Lives For a Day - a really fun movie!).
Wednesday evening was tied up with a very long hair appointment. I brought a book instead of worrying about any chemicals around my stitching.
Thursday was LNS night, but several of us had just received the instructions for the first part of Gay Ann Rogers' new Mystery in a Corner and we spent most of the evening picking out colors. Every person picked something different. It will be a lot of fun to see how they turn out. I tried to go with colors that were a bit outside my usual comfort range. Check out my jewel tones! They're based on the skeins of Plum Watercolours.
Winds of Color won't progress much over the next few days, either - for a VERY good reason. Marion Scoular is in town! Our EGA chapter is hosting her for a two-day class in long and short shading this Saturday and Sunday, then she'll go to Corning (about two hours away) for another two-day class in blackwork on Monday and Tuesday. I'll be taking both classes, driving down to Corning on Monday morning, staying there overnight, and heading home Tuesday evening. I'll try to post each evening to share the progress made that day.
This evening, five of us went to dinner with Marion. She is a wonderfully friendly and charming person, and I'm really looking forward to the next four days of classes.
Monday, April 14, 2008
Rivers, more sky, and a bit of dress
What a difference! The Treasure Ribbon was much, much, much easier to work with than 4 ply of the DMC spool metallic. I like the color of the rivers now, too!
I've been gradually working on the packed stem stitch. I know I had mentioned that the instructions called for packed outline stitch. Before starting these areas, I looked up the difference between stem and outline, since I can never remember. I ended up stitching stem stitch despite looking it up! For this purpose, it really doesn't matter, anyway. Since I started to get tired of stem stitch, I decided to start rewarding myself with stitching bits of the dress, which is padded satin stitch. Satin is much more of a standard canvas technique. I like the way the stem stitch areas are coming out, but I guess I'm still more comfortable with counted stitches rather than making the gazillion decisions about stitch length and angle and how to blend the colors along the curve of each area.In a comment about this piece on my last post, Jocelyn asked,
"I have been wondering how big it is, and if you have any plans yet, on how you will finish it? Mount it in a frame? What sort of frame?"The circle of Winds is 10" across. I haven't really thought much about how it will be finished. If I can't find an appropriate circular frame, I'll likely have mats cut with an inner circle in a square frame. What colors? Who knows? My framer's really good with color. She'll keep throwing different possibilities at it until it "clicks". Thanks for asking, and thanks to everyone else for the great comments!
Saturday, April 12, 2008
A busy week!
I can't believe it's been over a week since I last posted. This week was very busy with stitching activities. Only occasionally does the first Monday of the month fall in the same week as the second Wednesday, and when it does, it means we have meetings for both EGA and ANG in the same week, plus stitch night at the LNS on Thursday. Strangely enough, I didn't stitch much at all at the guild meetings, and I tried to make up for it the rest of the week, to the neglect of my blog.
Winds of Color is progressing nicely, though.I finished the darning areas in the sky, and once stitched, I found I liked it. During the stitching, I had my doubts! I've started the areas on the right side that are packed outline stitch.
Right now there are only two parts I want to restitch:
Winds of Color is progressing nicely, though.I finished the darning areas in the sky, and once stitched, I found I liked it. During the stitching, I had my doubts! I've started the areas on the right side that are packed outline stitch.
Right now there are only two parts I want to restitch:
- The area of sky on the left side with the blue grid looks really strange. I'm going to take it out, darken the background, and stitch it again.
- Also, I need to take out the river. This piece was designed in 1991, using threads available at that time. This is stitched with 4 strands of that DMC metallic that came on a spool. It's really hard to tame, plus I actually bent a needle trying to pull it (using hemostats) through the congress cloth and the existing stitches with all of the thread bulk. It's also not the best color here. While I was putting it in, I thought about all of the nice metallic ribbons that have been introduced in more recent years. After a trip to the LNS today, I've got a light blue card of Treasure Ribbon from Rainbow Gallery. Hopefully that will be easier to use and look better.
Friday, April 4, 2008
Open canvas
In response to one of my previous posts, Lelia commented that the idea of coloring the canvas before stitching was interesting. Since I've recently stitched some of the colored areas, the benefits of that coloring can be seen. I've mentioned before that Winds of Color was designed as an exercise in shading. One way to shade needlework is to color the background, then use a stitch that does not completely cover the background.
The areas 13, 14, 14a, and 15, shown at right, are all examples of this open stitch shading. In area 13, only one color of thread and one type of stitch was used. The colored background makes the difference from one end of the area to the other. The same is true for area 14. In area 15, both the background and the thread value changed.
Thursday, April 3, 2008
SBQ: The Essentials
Don't look now, but I'm actually answering an SBQ for the first time in a very long time...
This week’s SBQ was suggested by Terri and is:
What items do you consider essential to your needlework that you keep in your stitching bag?
Let's see. In the caddy on the arm of my stitching chair, I can find:
- A variety of needles stuck in the pincushion; everything from 28 to 22 tapestry needles to #10 crewel needles (great for beading or for ending threads) to long beading needles.
- A tekobari (Japanese laying tool) in a wooden case.
- Two pairs of good scissors, one Gingher and one Dovo (because I like them both and I need to be able to find scissors easily!).
- One pair of serrated-edge scissors for cutting metallics (so I don't ruin my good scissors)
- Hemostats, which are wonderful for pulling needles through the back of tight canvas stitches for ending off threads. These are rarely needed for linen work.
- A pen
- A pencil
- A telescoping magnet, which is necessary for tracking down errant needles or scissors that fell off the arm of the chair.
In my main stitching bag, I can also find more packs of needles and clean cosmetic sponges (great for dampening unruly/kinked threads). Also, I take my Elan lap stand with me to all stitching events, since a pinched nerve in my neck means I can only stitch "in hand" for very short periods of time.
Great question!