/** Google Analytics script below */ /** end Google Analytics script */
Showing posts with label hardanger. Show all posts

Sunday, July 11, 2010

Planning a path in hardanger

When stitching filling stitches in hardanger embroidery, it’s very helpful to think through the order of stitching, or the path you’re going to take.

I’ll walk through how I stitched the second end of my pastel hardanger piece (after I learned a few things with the first!).

The first step is to cut out the appropriate threads. But wait. In case you’re unfamiliar with hardanger, take a look at the little blocks of 5 stitches. These are called kloster blocks. They act as a fabric hem so the threads next to the blocks can be cut.

The result is a mesh where, both horizontally and vertically, you’ve got four threads intact, then a space where four threads were removed.

Knowing that I’ve got to work the divided branches on to center wrapped bars (which you’ll see below), I decided to do those wrapped bars first.

Looking back at my chart for this area (option 3 in the link), you’ll see that it calls for two wrapped bars side by side down the center. In the photo above, I’ve worked from the right side to the left, wrapping one side of these side-by-side wrapped bars, and I’ve started stitching back to the right, working the second of each pair. (Does this make sense?)

After finishing the side-by-side wrapped bars, I’m back on the right (seen above), and need to start needleweaving the outside sets of threads. As I work to the left, I’m putting in the divided branches where they’re needed. In the photo below, you can see how these wrap over the wrapped bars and distort them.

In the very center, I did a different type of divided branch, where two points are anchored in fabric, and the other is over a wrapped bar. I’m sure somebody else has done this, but I don’t recall seeing it in any books.

Reaching the left side again, I’m traveling to the other bars that need weaving by slipping under the kloster blocks on the reverse side of the piece. Then I’m working back to the right.

Upon reaching the center of this path, there’s a bit of a snag. I need to stitch side-by-side wrapped bars again. Unfortunately, there’s no help for it.

I decide to stitch the lower one first, putting in the dove’s eye, then I need to somehow stitch the other wrapped bar. I did this slightly differently on each end. If I did it again, I’d repeat this method: I kept stitching the rest of the path, then went back to wrap that last bar at the end, burying the thread in the neighboring needleweaving. Anybody have a better idea?

Only a little bit left to do before the stitching is complete on this!

Friday, July 9, 2010

Friday Finish: My first Hardanger

In the spirit of the Hardanger piece I'm working on now, I present the very first Hardanger design I ever stitched.

Design: a runner made from doubling the bellpull design from Cross 'N Patch's Charity Sampler booklet

Designer: Emie Bishop

Technique: Hardanger and cross stitch

Ground fabric: 32ct evenweave (jobelan, maybe?)

Threads: pearl cotton and floss

Stitches used: cross stitch, kloster blocks, buttonhole, lacy edge, bullions, dove's eyes, spider webs, other filling stitches

Stitching timeframe: Finished in 1996. I'm guessing I worked on and off on this for a year, given that I was in college at the time.

This was my first Hardanger piece, as I mentioned above. It is a prime example of the attitude of "It's just string." Or it could have been simple ignorance. Take your pick.

  • I didn’t think it was a big deal to essentially stitch the bellpull (which consisted of two of the diamond repeats and the heart at the bottom) twice.
  • I didn't know lacy edge and bullions were supposed to be difficult.
  • I do recall vigilantly checking the alignment of my kloster blocks before cutting any threads, but I don't really remember any anxiety about cutting the threads once I knew everything lined up.

In hindsight, it’s easy to see that I should have practiced bullion knots on a doodle cloth before putting them on the real piece. In this picture, you can see the little squares made up of bullion knots on the right, where I started, and those on the left, where I finished after going all the way around the piece. There is a very distinct difference in tension!

I don’t really recall having much difficulty with the lacy edge, but to this day, I haven’t used this stitch on any other piece.

Here’s a close up of one of the ends of the design.

I should find a place to display this rather than keeping it in my cedar chest. Maybe a high shelf where little fingers can’t reach.

Wednesday, July 7, 2010

Hardanger: Option 3 Before and After

Last week I posted three options for the end area of my pastel hardanger design. The responses from readers overwhelmingly agreed that option 3 was the way to go.

So, what does option 3 look like, once it’s stitched? The photo below gives a good idea of the “before” and the “after.”

The picture of the entire piece shows how this decision works with the rest of the design.

I think all of you were right. This option really does compliment and balance the open areas near the center.

Monday, June 28, 2010

Hardanger: Studying possibilities

In my last post, I was debating what to stitch in the yet-undefined areas of my pastel hardanger piece. Thanks for the great comments!

Rachel agreed that I definitely couldn’t use any raised embroidery for a runner. Thanks for pointing out the issue with vases tipping over.

Pat suggested that I fill in the spaces with kloster blocks, and not do cutwork at all. A valid idea, and not one I had considered before!

Sylvia suggested small cross stitch roses for the tiny areas near the center. I’ll consider this, but these are really small areas. I’d need a design that covers no more than about 10 threads square. (Oh, and Sylvia, the overdye I’m using is Watercolours on 25 ct. It’s more like a pearl 5 rather than an 8 or 12. Though there are a few alternatives you might use. That’s another post!)

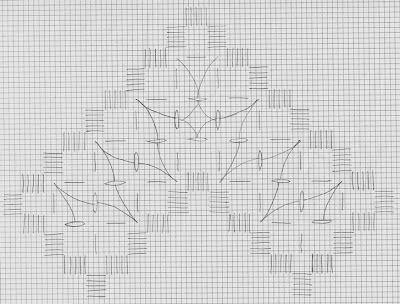
Yvette and Sylvia both liked the suggestion of opening up the end areas and filling them with needleweaving. I really think this would balance the open areas near the center, so I’ve charted a few possibilities.

First, my symbol key:


Option 1:  This one worked really well for the diagonal portions, but I couldn’t find a filling stitch that flowed with these for the top of the section.


Option 2: This time I started with the top, then had issues with the diagonal areas.


Option 3: After moving the divided branches around, they seemed to flow into a dove’s eye at the top.


It’s probably pretty obvious that I’m leaning toward Option 3. What do you think?

Tuesday, June 22, 2010

Hardanger progress and a dilemma

You’re all getting tired of hearing it from me, I’m sure, but can I just say what a joy it is to be able to stitch in hand again?

Over the past week, I finished the planned cutwork areas of my pastel hardanger piece! Don’t think it’s done yet, though, because there are a few small areas that still need to be defined. See the areas marked with an ‘X’ in the picture? I’m still figuring them out.

I originally thought that I might put some surface embroidery there, like bullion knot roses, but I’m reconsidering that plan. Bullion knot roses are dimensional, and since this is a small runner, shouldn’t it be relatively flat?

Then I thought I might put cutwork in those areas to balance the large areas of cutwork near the center of the design. However, there’s one major flaw in the placement of my kloster blocks. Check out the larger picture below.

See the black lines? These show the potential cut lines in that small diamond. The area isn’t symmetric. Generally diamonds like this are designed such that you can have an open area at each corner of the diamond. If you look at the two other small diamonds bordering this, you’ll see the same problem. This layout is awkward when it comes to determining a fill for cutwork.

I think I’m going to take out the kloster blocks marked with the red lines and use the entire area for cutwork. There will still be a couple of points of this area that can’t be cut, but that should be less awkward with the larger area. I’ve got to make a few sketches and see how it would work.

What do you think?

Sunday, May 23, 2010

Rediscovering the joy of Hardanger, and a public service message

Thanks for all of the votes on projects from my last post. I decided to pick up my original Hardanger design.

I have always subscribed to the Janice Love method of stitching Hardanger "in hand" rather than on a frame. Due to my carpal tunnel syndrome, I can't tell you the last time I was able to spend more than about 15 minutes in any given week working in hand.

Thank goodness for modern medicine!

For the first time in years, I have been able to comfortably stitch away on my Hardanger. I had forgotten how enjoyable it could be. I've gotten a bit out of practice, so my tension isn't as good as it once was, but it's so amazing to be able to do needleweaving without waiting for the onset of pain.

I haven't made a great deal of progress, so no picture today, but I just wanted to pass the message on.

If you're experiencing the pain and/or numbness of carpal tunnel syndrome and have tried non-surgical treatment without improvement and if these symptoms are keeping you from enjoying your stitching, please do consider surgery.

I put it off for much, much too long. Fortunately I didn't end up with any permanent nerve damage, but I did need to set aside many enjoyable techniques, including Hardanger, off-loom beading, and shuttle tatting.

Take care of yourselves, everybody, so you can enjoy your stitching (and the rest of your life!) to the fullest!

Monday, November 30, 2009

WIP: Blue Hardanger (original)

Hooray! It's November 30! I made it through NaBloPoMo, though it was a close call with a late post yesterday. Time for one last featured WIP. It is another original design that I refer to as the Blue Hardanger.


Technique/Materials:  Hardanger on 25ct lugana.  The kloster blocks and buttonhole are stitched in Caron's Watercolours.  The rest of the stitching is in pearl cotton.

Background:  I think I started this around 8 years ago. Unlike the pastel hardanger, I started working this one from the inside out. I figured out the octagon shape, then created a nine-patch of octagons, figuring out the outside border after that.

Why it's not done:  I really hate sounding like a broke record, so you can fill in the blanks. Worked in-hand, nerve problems, yada yada.

What's left to do:  The remaining buttonhole around the outside, and all of the filling stitches, both the dove's eyes and needleweaving inside the octagon shapes and the larger blocks that will allow for fancier stitches.

Monday, November 16, 2009

WIP: Heirloom Anniversary Sampler (by Victoria Sampler)

Yet another sampler is today's featured WIP. It is the Heirloom Anniversary Sampler designed by Thea Dueck of The Victoria Sampler. I'm stitching this as our wedding sampler, although I could have used it as our 10th anniversary sampler this year! :-(


(My apologies for the awful photo. I'll try to get a better one in the sunlight this weekend.)

Technique/Materials:  Lots of different sampler stitches, including drawn-thread work, pulled work, silk ribbon embroidery, and hardanger with silk threads on 28ct platinum Cashel linen.

Background:  I think I started this in early 2000, shortly after we got married in the fall of 1999, with the aim of making this our wedding sampler. Instead of a number inside the silk ribbon heart at the top, I'm planning to put the initial of our last name. As usual, I had to make the original design more complex by combining the big sampler with the hardanger border shown on the small design on the back of the chart.

Why it's not done:  Same old story, with respect to the hardanger. The carpal tunnel and the pinched nerve in my neck act up with the needle weaving. I also haven't found a great monogram alphabet to add our initial in the heart at the top.

What's left to do: I've just got to finish the rest of the hardanger border, then add a monogram in surface embroidery inside the heart.

Monday, November 9, 2009

WIP: Nameless hardanger #1 (original)

Today's featured WIP is one of my two nameless hardanger pieces.  Yes, it's an original, and I refer to this one as the "pastel hardanger."


Technique/Materials:  Hardanger on 25ct lugana.  Most of the kloster blocks and buttonhole are stitched in Caron's Watercolours.  The rest of the stitching is in pearl cotton.

Background:  This was started 9 or 10(!) years ago.  I only recall when because it was before we purchased our house.  I didn't chart this out at all before starting.  I started with a piece of fabric and started stitching kloster blocks at one end in a more-or-less random zigzag to the halfway point of the fabric, then mirrored that pattern to the other end, and again down the other side.  I think I then charted out the result and played with different possible divisions and fillings.  I still haven't figured out what goes into the three small areas at each end and the two tiny areas on each side.

Why it's not done:  I really like the way this is coming out, but I can only do the needle weaving in very brief stints due to carpal tunnel and other nerve issues.  I can't do any "in hand" work these days.  As a result, this piece only sees very brief activity every once in a while.

What's left to do:  The rest of the filling stitches, and then figuring out what to put in the little areas.  Any ideas?

Friday, November 9, 2007

SBQ Backlog

Since I haven't answered any SBQs (Stitching Bloggers' Questions) in a very long time, I'll at least catch up on the last few weeks of questions today.

This week's SBQ is:

When you have to frog out stitches, do you reuse that thread or do you start over with a new strand?

Ok, first a stitching glossary refresher: "frogging" refers to ripping out mistakes in stitching: "Rippit, rippit!"

Generally, I do not reuse a thread after frogging, since it often becomes frayed or at least loses its luster. The exceptions might be if it's only a stitch or two OR if I'm really low on the thread needed. In fact, if I have to rip out large areas, I generally cut the threads in several places to make frogging easier, which means I can't reuse the thread.

The SBQ for October 31 was suggested by Ternezia:

If you were a cross stitch designer, what would your design style be?

I can't see myself designing cross stitch. I have designed a few hardanger pieces (one of which is actually done), and have put many ideas for geometric needlepoint down on paper. Waving hand - hello, engineer here! Geometric designs are easy for me!

Here's my completed hardanger design:

The SBQ for October 24 was :

Do you railroad?

Another stitching glossary definition: Railroading is a technique to make two floss plies lay side by side. To railroad, before pushing the needle through the fabric to finish a stitch, you separate the two strands of floss by passing the needle between them. It's hard to describe without pictures. Check out this page for a better description.

Now, to answer the question. I will sometimes railroad a stitch or two. Generally, though, I prefer to use a laying tool. It seems that when I railroad, one ply ends up twisted too tightly, and the other gets all fuzzy because it's untwisting. Somebody once described it as ending up with one ply like Marcia Brady hair, and the other like Jan Brady hair!

(If anybody would like it, I'll try to post pictures of how to use a laying tool. It may have to wait a bit, because I'll need assistance with taking pictures of it. Using the laying tool takes two hands!)


The SBQ for October 17 was suggested by Jennifer:

What proportion of your stitching is for your own personal use versus gifts?

The majority of my stitching is for my own enjoyment while I'm working on it. I don't always frame or otherwise "finish" every piece I complete. Many of them are tucked away into a closet. That said, I don't necessarily want to give them away, either. I only give stitched pieces to folks I know will appreciate it. If I'm not sure, as in a wedding piece from earlier this year, I stitch something very simple. Since I don't like to stitch simple pieces, I don't do a lot of this!

So I haven't really answered the question! I suppose I give away maybe 5% or less of my stitching.

Have a great day!