/** Google Analytics script below */ /** end Google Analytics script */

Tuesday, December 30, 2008

Pocket progress

Thank you to DH for bringing my camera in to the hospital!

Blueberry Pocket is continuing to work up quickly. It's got enough variety to keep it interesting, and I'm enjoying seeing such good progress. Unfortunately, I'm finding that I've run short on one color. Others are possibly going to run out, but I'm trying to be very frugal, so we'll see.

In the wide center band, notice the leaves that aren't filled in and the hexagon shapes in the vine. There wasn't nearly enough thread in the kit to do all of the stitching in these areas. The good news is that DH braved my stash collection and was able to find the same value of silk. The bad news is that the dye lot doesn't really match. You can see the difference between the left-most hexagon and the leaves just above and to the right of it.

I don't even have enough of the original dye lot to finish the three leaves in the center, so I think all of this will have to be frogged. Oh well, it gives me something to do tomorrow when a few of my stitching friends will be visiting!

**************************************
Pregnancy ticker: 30 weeks, 4 days.

I'm learning to appreciate small bits of freedom. Yesterday, I took my once-weekly 30-minute wheelchair ride. DH took me down to the lobby, bought a hot chocolate for me, and we sat in the sunshine in a quiet hallway. I was so unused to such bright sunlight that he had to turn the chair away from the windows to keep my eyes from tearing! :-)

On top of that, today the doctors decided I've been stable for long enough, and I'm now allowed to take short walks around the nurse's station in the center of this unit. Small victories are wonderful!

Sunday, December 28, 2008

ANG ribbon winners

Last night, I received my January 2009 issue of NeedlePointers, the ANG magazine. I knew that this issue would feature the ribbon winners from the Indian Wells seminar, and I was looking forward to reading about and seeing the various entries.

I'm always amazed that the judges can rank such beautiful work. All of the winning entries are stunning. The creativity and technical skill that goes into these creations is inspirational. Thank you to ANG for taking the time to take such wonderful pictures of these pieces and add such great descriptions. The write-ups for each piece help me to fully appreciate the work and creativity of each stitcher.

The closeup picture of my Lilacs on page 22 was a great surprise (and a bit humbling). I didn't expect such a large picture! The dimensions in the description (7" x 8.5") are of the framed piece. The actual stitching is actually a tiny bit smaller than the picture in the magazine. The write-up that accompanies the picture is lovely and much appreciated! (If you don't get the magazine, you can see a picture of this piece in one of my past posts, and there's a picture of the ribbon as part of this post.)

Congratulations to all of the entrants, and especially to my fellow ribbon winners. I'm already thinking about what piece or pieces to send in for next year's exhibit!

**************************************
Pregnancy ticker: 30 weeks, 2 days.
Still boring! :-)

Saturday, December 27, 2008

Blueberry Pocket

This morning, I figured out how to email myself a picture of my partially-completed Blueberry Pocket from Periwinkle Promises. Unfortunately, the cell phone pictures are nowhere near as clear as those taken with my usual camera.

On the up side, I told DH that this was my workaround, so he'll now be bringing me my camera. Apparently each emailed picture adds 25 cents to the cell phone bill, and the potential cost of that is worth the off chance that the camera might disappear! :-)

So, on to the stitching. I started this piece a few years ago to work on at an occasional lunch hour, but didn't get very far. When I started all of the doctor's appointments this year, I was only on the first blackwork band! When I arrived in the hospital this week, I had half of the band of hearts done. Everything below that has been stitched since Monday!

I've slowed down a bit with the current band because the berries (of which there are four are stitched) are all made up of smyrna crosses. They seem to be taking a very long time! Then again, right now I have nothing but time!

************************************************
Pregnancy ticker: 30 weeks, 1 day.
Each day, the doctors come around and ask me the same questions regarding my condition. Each day, I give them the same responses. Essentially, nothing's changing. Today, I said that I must be their most boring patient, and they assured me that boring is good right now. :-)

Friday, December 26, 2008

A change in location

I had grand hopes of finishing my Santa canvas before Christmas, but it was not to be. Instead, I've been working on a sampler pocket from Periwinkle Promises for the last several days.

Why, you ask?

Because this project has been my "doctors' waiting room" project, and it was what I grabbed when DH and I left home at 4AM Monday morning.

Yup. I've been in the hospital all week, and (I never thought I'd be saying this) hopefully I'll be here for several more weeks.

It seems that the complications I've been having have led to yet another: my water broke!

So now, they've been pumping me full of antibiotics to prevent infection, since that barrier is no longer there. At this stage, that's its main purpose, so BJ is continuing to develop, but has little protection against any nasty bugs.

So I'll be in the hospital for up to 5 more weeks. We're at 30 weeks today, and if all continues to go well, they may have to induce at 35 weeks, at which point the doctors say we're actually better off with BJ in the NICU for a bit. I don't really understand why, but we'll deal with that if and when we come to it.

Right now, I feel fine. I'm in no pain, and BJ is healthy and continuing to grow. I'm still stitching, watching TV, reading, and working through puzzle magazines. DH (thankfully) brought me the old laptop so I could let all of you know what's going on.

The camera is at home, so I won't be able to share progress pictures unless I figure out how to take them with my cell and email them to myself. Of course, I don't have anything else I have to be doing, so that might be a project over the next few days. I don't know if those pictures will be good enough to continue with the stitch studies, even if I have DH bring the stitch study sampler to the hospital. We'll see.

Thank you all again for your best wishes. I feel blessed that people I've never met are keeping tabs on us.

I'll keep you posted as best I can.

Thursday, December 25, 2008

Merry Christmas!

Merry Christmas, Everyone!

I hope everyone has a wonderful Christmas (or holiday of your choice!), filled with the love and laughter of family and friends. Take a bit of time to stitch!

To celebrate, please enjoy this poem, of unknown origin, that's been making the rounds of other blogs and email lists (not very original of me, but it's fun anyway!):

'Twas the night before Christmas, and, oh, I was weary.
My stitching unfinished, my eyes getting bleary.
The stockings weren't finished, the chimney was bare.
And I knew that morning soon would be there.

My children and husband were tucked in their beds,
But visions of backstitches ran through my head.
I'd stitched ornaments and presents and gifts by the ton,
And now, I was finally, almost, almost done.

As I poised my needle for one more backstitch,
I heard something outside that made my hand twitch.
I jumped up from my stitching, and flew to the door,
Pressed my eye to the peephole, tip-toed off the floor.

My stitching forgotten, I peered into the night.
When suddenly, I got a terrible fright.
On my porch appeared Santa, holding his sack.
He knocked softly, and I took a giant step back.

I unlocked the deadbolt, and let Santa in,
He entered and gave a mischievous grin.
"Hope you don't mind if I come in the door?"
"Coming down the chimney can be quite a chore."

He said, "You're up late. Still working I see."
"Do you know how tired you're going to be?"
"I know, Santa," I said, with a sigh,
"But I'm still backstitching the stars in the sky,"

"And the fields on that stocking look blobby you know,
I need to backstitch the drifts in the snow.
I've been stitching and stitching and stitching, no rest.
I just tried to finish stitching too much, I guess."

"I know what you mean," he said with a smile.
"This is my busiest time of the year, by a mile."
He stooped down by the tree, and he opened his sack,
And began to pull presents out of his pack.

"I've got some things here I think you might like,
An oak stitching frame, and a brand new Ott-Light.
A bundle of floss, and a great big mat cutter,"
I smiled and felt my heart go a-flutter.

He put down gifts for us all, then he waved his right hand.
"Go to bed," he said, glancing at my floor stand.
He gave me a wink, and stepped out the door.
I just stood there a moment, glued to the floor.

After he'd left, I turned back to my chair,
Picked up the stockings, and started to stare.
The backstitching was done! The stars lit the sky!
And on my son's stocking angels sung on high.

I ran to thank Santa for this final gift,
And watched as his sleigh started to lift.
I heard him exclaim as he pulled out of sight,
"Merry stitching to all, and to all a good night!"

In case you were wondering, the picture at the top of this post is Rebecca Wood's "Country Winter" painted canvas, now on sale at NeedleNook of La Jolla.

*****************************************
Pregnancy ticker: 29 weeks, 6 days.
I'm sure some of you have been wondering about why I haven't posted in a few days. There's a story behind that, but it will wait until tomorrow!

Sunday, December 21, 2008

Stitch Study 3: Detached Buttonhole with Return

Disclaimer: This stitch study builds on the previous lessons of detached buttonhole (DBH) and filling shapes with DBH. To minimize any confusion over steps skipped in this tutorial, please review the previous stitch studies.

In basic DBH, if you'll recall, we always brought the thread to the back at the right side of each row and started the next row again on the left. Detached buttonhole with return makes use of that return thread and provides slightly more coverage. Otherwise, the method of stitching is very similar.

We'll start again with a block of stitching, then move on to filling shapes. In the example, I'm using size 12 pearl cotton on 30ct linen.

To begin the block, again start by backstitching a foundation row. With this stitch, this row will be worked left to right, so you end up on the right side of the block.

I made a total of 12 stitches in my foundation row. After the last stitch, bring the needle to the front of the fabric just a tiny bit below the end of the row. The thread should emerge about halfway down the total distance to be covered by your first row of DBH. In my original DBH sample, I covered 2 linen threads with each row, so this time I'm bringing the thread up just one thread down from the foundation.

Sink the needle and thread on the left side of the block, keeping the distance from the foundation row constant. This is the first return thread.

To start the first row of DBH, come up again just a bit below the
return thread on the left side.


You'll now start working detached buttonhole as usual, but instead of just stitching under the foundation row, you'll run the needle under both the foundation row and the return thread.

Proceed in this way across the block. Remember the number of DBH should equal the number of stitches in the foundation row. At the end of the first row, sink the needle, and come up again just a bit below that.

Again, bring the return thread across the front, sink it on the left, and begin the next row of DBH. That's really all there is to this stitch. Remember, as in basic DBH, to keep the number of stitches constant across the block by stitching into the first leg on one row and the next leg on alternate rows. (See the basic DBH stitch study if this is unclear.)

Here's what the stitch looks like on the reverse side. There is very little thread on the back with this variation.

Filling shapes with DBH with return should also look very familiar. Here, I've switched to size 8 pearl cotton. Again, backstitch the shape, then bring your return thread across the shape slightly below the side you're calling your foundation row.

Work the DBH through the foundation row and under the return thread.

Keep going. Notice that sometimes, especially when you're not working squarely with the grain of the fabric, that the return thread can look a bit skewed. That's OK. The DBH stitches will force it back into position. If they don't, try purposely stitching your next return thread at a slight angle to bring the rows of DBH back to the desired angle. Little tweaks here and there will not be noticeable.

If your shape has areas that separate from the main shape, like the points on the flower here, again, just work each of these as a separate shape. Notice that in my far right point (at the arrow), my DBH doesn't actually go all the way to the point. There isn't room for another row. The initial backstitching fills in the gap.

I was able to completely cover most of the other points with DBH. In this picture, you can compare the original basic DBH on the left with the DBH with return on the right. Notice the slight difference in texture. The stitches on the right are a tiny bit bigger, since we don't need as many to get coverage. There are 16 rows of DBH in total on the left, but only 13 on the right, though the petals are almost exactly the same length.

I'm slowly building toward the stitch that Megan originally requested, which is the detached buttonhole with only some edges attached to the fabric. Only a few more stitch studies to go, Megan! The next study will be on back-and-forth detached buttonhole.

Saturday, December 20, 2008

Lots of Santa Progress

Given that I can't do much besides sit or sleep, Celebration Santa has seen a lot of progress. Since the last post about this piece, I've stitched several large areas, including all of his clothing (save the hat and footwear) and his pack. I love the fact that the strap for the pack is an actual strap made of ultrasuede (I think).

As you can see, I've also begun the background. I wasn't sure about using the Oriental stitch for the background, because it seems so heavy. I will be having this finished as a stand-up, though, and think that once the sides are curved around the stuffing, Santa won't be overwhelmed with the background. If I were to finish this as a framed piece, I'd have to reconsider. I did reduce the number of floss strands from 5 to 4, though. I find that 4 strands covers very well with diagonal stitches, where 5 just seems bulky.

Before I do too much more on the background, I need to make some decisions on the tree and his feet. The stitch guide calls for long and short stitch on the tree, but I don't know if that will work. Unfortunately, the picture of the original shows so many ornaments on the tree that I can't tell how it was stitched. I'm going through some stitch books to see if I can find some alternatives to long and short, but I definitely think my Santa will be carrying an undecorated tree. I'm not sure why Santa would carry a tree at all, but if he were to do so, why would it be decorated?

As for the feet, my critics here (DH, Mom, and MIL) and I all agree that his feet look, well, feminine. Like ballet slippers. I'm going to play a bit with some photo editing software (or just a paper copy and markers!) to overlay boots on top to see how that would look. I'll just square off the toe, add a bit of a heel, and make the whole thing black or brown. Any other ideas?

****************************************
Pregnancy ticker: 29 weeks, 1 day
Yesterday afternoon, I had an appointment for fetal monitoring (a non-stress test, which measures heartrate and movement). Normally, this appointment, including the car trip, should take less than an hour and a half. Instead, due to a snowstorm that started in the late morning and dumped almost a foot of snow by 5PM, the trip, in total, took three and a half hours. Non-stress, you say? Well, apparently it was all me, because the monitoring looked great.

Oh, by the way, DH suggested an alternative name to "TK" ("The Kid"), which he never really liked anyway. So now, we're referring to the baby as "BJ", short for "Bundle of Joy". :-)

Wednesday, December 17, 2008

Gratitude

Sometimes it takes trying times to make a person appreciate how lucky she really is. I'd like to take this opportunity to say thank you to several people.

After I started stitching Joan Thomasson's Celebration Santa, I realized my stitch guide was missing a page. I posted a note to a couple of the needlepoint email lists, asking if anybody had the information from that page.

  • Thank you to all the ladies from the ANG list and from the needlepoint etc. list who directed me to Joan Thomasson's website or sent me her email. The online stitching community comes through again.
  • Thank you to Jane of Chilly Hollow who brought my problem to Joan's attention via an email of her own.
  • And a very big thank you to Joan Thomasson who very graciously and generously offered to send me not only the missing page, but to replace the entire stitch guide so I'd have a complete version!
The response to my stitch study posts has been wonderful. Thank you to all who have written in suggestions and comments, or have mentioned the studies on your blogs. I really appreciate it. (Oh, and in case you're wondering, yes, I hope to have another stitch study up by the end of this upcoming weekend.)

On to life. Up until recently, I've been pretty mum on my personal life. I still intend for this to remain primarily my stitching blog, but of course, from time to time, life takes over. I'm very glad I explained my week-long absence due to my hospitalization.
  • Thanks to all of you who wrote expressing concern for me and for the baby. It's meant so very much to me to know that so many are keeping tabs on the "pregnancy ticker" at the bottom of each post.
  • Thank you to the stitchers in my local stitching groups who have been so supportive, sending cards and emails to let me know you care.
  • Thank you to the folks at work, including my managers, who have been fully behind me. A couple of them took the time to visit today, and it was a welcome diversion. DH and I work at the same company, and he has received many words of encouragement and support. One of his co-workers even purchased dinner (frozen lasagna, salad, and cookies) for us yesterday!
  • Thank you to the many nurses, doctors, and support staff (though it's doubtful any of them will ever read this!) who watched me around the clock and continue to monitor our progress.
  • Most importantly, thank you to my family. DH has been amazing, picking up all the little things I can't do anymore, from grocery shopping, to keeping up with the dog and the household cleanup, to pulling out the Christmas decorations, and a million other little things. Mom, MIL, and my sister have been there during the days to help keep me company (both in the hospital and at home), driving me to appointments, taking the dog out, getting me lunch, and putting up the decorations. Many other family members have taken the time to call, send a note, or visit me in the hospital. Thank you all. It means so much!
It's humbling to have so much to be grateful for.

****************************************
Pregnancy ticker: 28 weeks, 5 days.
According to the doctors, I'm still in the "high risk group" due to some of the complications, but the good news is that TK is in the 42nd percentile for weight and still appears to be developing normally.

Monday, December 15, 2008

Santa's Toys

When I started stitching the toys on Joan Thomasson's Celebration Santa, I just jumped right in. I very quickly realized that I'd be stitching over some of the details and going back to fill them in - with no knowledge of what I was going to be detailing.

It was then that I remembered one of the golden rules of stitching painted canvases: Make a copy first! I don't know why I didn't think of it initially. I regularly read the blog of Jane of Chilly Hollow (painted canvas stitcher extraordinare), and she always makes a copy of her canvases before stitching. Well, better late than never, and I figure a photo is just as good as a copy. So, with just the blue of the doll's dress stitched, this is the "before" picture.

The toys were mostly stitched in basketweave, with a few french knots for eyes, straight stitches for the horse's mane and tail, and backstitches for details as needed. I didn't do the doll's mouth yet. I'll catch that when I'm stitching Santa's coat.

I made one change from the stitch guide: rather than stitching the doll's hair in orderly rows of french knots, I gave her "sausage curls" in bullion knots. These were fun (yes, I actually enjoy the challenge of bullions), worked up quickly, and give a bit of dimension.

I also stitched the drum, which worked up quickly compared to all of the basketweave. It just uses satin stitches for the triangles and some couched metallic for the rim.

I love the way the toys came out, and I'm very glad I stitched them before stitching the brown of Santa's bag or the red of his coat. Now I can do those large areas without worrying that I'm stitching over a detail needed to bring the toys to life!

Thank you Jane, for your advice! I have other things to thank you and others for, but that's another post!

**********************************
Pregnancy ticker: 28 weeks, 3 days.
Santa's keeping me occupied, so I'm not going crazy (or overdoing it) yet!

Sunday, December 14, 2008

Celebration Santa

A few weeks ago, I told the story of winning the opportunity basket at the holiday party of my EGA chapter. Shortly thereafter, I felt like getting into the spirit of the holidays by stitching something seasonal, and realized that despite my pile of (close to 40) WIPs, I didn't have a single Christmas/winter project! What's a girl to do?

Yup. I did it. I started something from my basket. Specifically, I started the Celebration Santa by Joan Thomasson. This canvas came with the stitch guide and the threads, so I didn't have to do any prep work. I started the face on December 4th, at the LNS "open stitch". Santa stayed home while I was in the hospital (though I did have a small project there, of course). Since I've been home, I've been celebrating the holidays the only way I can - by working on Santa while watching Christmas movies on TV.

I've long admired Joan's Santa and angel designs. Her stitch selections are wonderful! I've never done one before, though, because I really don't like the way her characters' eyes are depicted. I decided that my Santa needed a bit more personality in his eyes than just the slash of black.

I started by filling the entire face with tent stitch in pink (for the cheeks) and flesh tones (for everything else), stitching right over the black eyes and the eyebrows. I went back with a single ply of floss, and with a sharp needle, satin stitched the eyes with white. A french knot in blue-gray silk made up the irises. The white blended in a bit too much, so I outlined the top of the eyes with a single strand of brown floss. I used the same brown to sketch a nose. Bullion stitches in white floss worked well for eyebrows.

After the face, I moved on to the sleeves, following the suggestions in the stitch guide. I still need to go back and add fold lines, but I really like the richness of the sleeves.

I've since been working on the toys, but those will be featured in tomorrow's post!

*****************************************

Pregnancy Ticker: 28 weeks, 2 days.
Regarding bedrest: In my case, "bedrest" only means staying off of my feet as much as possible. With medical permission, I am able to shower each morning before heading downstairs, where I occasionally move (slowly) between my stitching nest and the sofa. Fortunately, I don't actually have to prop myself up in bed to stitch!

Friday, December 12, 2008

Happy Dance: Challenge Ornament

Last week, I finally pulled out the instructions for the Challenge Ornament from Gay Ann Rogers.

Step 1: This was a great opportunity to use up some of the threads in my stash. I started with a skein of Watercolours in shades of violet, periwinkle, and olive green, and then pulled other threads to match it. I found some pale gray canvas that worked well with the colors.

I couldn't really figure out how to start with step 2, but knew I wanted to use the variegated Watercolours on the partial scotch stitch in step 3.

After that, it was a little easier to pick colors for the long couched borders for step 2. I used the Watercolours on the outside border, a bright olive green (though it shows up too bright in the picture) Shepherd's Wool for two other borders, and some purples left over from my Mystery in a Corner for the remainder.

The waffle stitch in the center was step 4. I started with silver metallic ribbon, picked up a heavy purple thread from a grab bag purchase, and finished it with some laid Splendor silk in periwinkle. I really like the effect of the multiple colors, and the use of a thicker thread for two rounds gives it a bit of dimension.

Step 5 brought me to some diagonal borders. I continued to use the periwinkle silk, then just a touch more of the brighter green.

For the rest of step 5, I repeated one of the overstitching combinations I used in Mystery in a Corner, with metallic stitches nested inside longer stitches with Impressions. This brought the violet from the inside borders out toward the corners.

I used a bit more of the metallic violet in the smyrna crosses at the center of each side. These anchored the rest of the overstitching on the sides. I added some pale stitches in Impressions from these to just inside the green border, embellishing a bit on Gay Ann's original directions. I finished off steps 6 and 7 with a lightweight olive green thread in a slightly darker tone than used previously.

That finished off the stitching according to the ornament directions, but I thought the corners seemed a bit bare. I added just a bit more overstitching, again with the violet metallic.

Now, the stitching is finished. I'm going to (eventually) finish it into an ornament on point. I think it looks a little more "right" this way.

********************************************
On a more personal note: Thank you to all who left such encouraging comments on yesterday's post. All is still well as of today. The pregancy ticker is officially at 28 weeks today (out of a normal term of 40 weeks). We'd like to reach at least 34 weeks to minimize future complications. I'll continue with an update at the end of each blog post. It helps to know so many of you are pulling for me. Thank you.

Thursday, December 11, 2008

Housebound, Day 1

Last Saturday, I had started a post about working though the Challenge Ornament from Gay Ann Rogers. All the pictures were uploaded to Blogger before DH and I had to run some errands. I had planned to finish the post Saturday evening.

Little did I know that I was not going to be home Saturday evening, or at all until last night. Due to complications with the pregnancy, I've been in the hospital. Instead of writing my blog post, I spent Saturday night and Sunday being poked and prodded, being reviewed by anesthesiologists in case of an emergency C-section, talking to NICU about the possibility of caring for a baby born 12 weeks early, considering the possibility that I might need to be in the hospital for the next three months, and praying that it was all "just in case" and that the symptoms would clear up enough to let me go home.

Fortunately, the prayers were heard. I'm home, after the majority of my symptoms cleared up by Monday afternoon. I'm on "bedrest with bathroom privileges", but at least I can be home instead of in the hospital. The good news is that I can sit up, so at least I'll be able to stitch so I don't go completely crazy.

Later today or tomorrow, I'll finish that post about the ornament!

Wednesday, December 3, 2008

Stitch Study 2: Shapes in Detached Buttonhole

Basic detached buttonhole (abbreviated DBH here) is pretty, but most designs don't just use a block of it by itself. Most pieces that use DBH use it to fill specific shapes, such as a flower petal or a leaf. Today's stitch study investigates how to approach such shapes.

In the example, I'm using size 8 pearl cotton on 30 ct linen. I've traced a fairly complex shape with a pencil, but you can just as easily start out with a simple leaf or a rounded petal.

To start, I need to decide the direction of the stitches. I could start with one of the long flat sides, but I don't want the rows of buttonhole at that angle. I really want them going across the petal, somewhat aligned with the fabric weave. That means I can either start at the four points or at the skinny end. To tell you the truth, I'm not really sure how to start at the four points, so I'm starting at the narrow end of the petal.

If your shape is different, think about how you want the stitches to look. For most flowers, you probably want the lines of DBH along the width of the petal. For leaves, you might need to play around to see what direction suits you. I'm going to work through the rest of this study as if you have the same shape, and then go back to try to address other shapes, so stay with me!

Begin by backstitching around the entire shape. Try to keep the stitch length somewhat consistent, but if it's not perfect, it's not a problem. We're only going to be stitching into the backstitch on the very first row. The rest of the backstitch just works to fill in the color at the edge of the shape.

As in basic DBH, come up on the left side of the area, a bit below the edge you're using as the foundation row. Always begin and end your rows of buttonhole outside the backstitch outline.

You're then going to proceed as in basic DBH, working into the foundation row of backstitches. In this shape, this means we only have two buttonhole stitches into the two top-most backstitches. Sink the needle on the right side of the area, just outside the outline.


Come up again on the left side. To fill in my shape, this row needs to be a bit longer than the first, so we're going to need to increase the number of stitches, but just by a little bit. I think three stitches will work fine. In basic DBH, we alternated every other row between working into the first leg and then the final leg of the previous stitches. With the shape here, we can work into both the first let and final leg of the previous row and end up with three DBH stitches. Start this row by stitching into the first leg, as in the picture on the right, then into the loop between the stitches, then into the last leg, as in the picture on the left. Sink the needle at the end of the row.

Because this shape increases gradually and evenly on both sides, we can continue working this way, simply adding another stitch each row by stitching into the first and final legs of previous rows. If you find that it's starting to grow too much, simply don't increase on a row or two. In the picture on the right, I've skipped the first leg, and just started to work into the loops between the stitches.

In other cases, you'll need to increase by more than one stitch on a row. In such a case, work additional stitches into the first leg or the final leg on the previous row. Here, I've made a stitch into the first leg, and, at right, a second stitch into that first leg.

You may be tempted to try to increase in the middle of the row by making two stitches into the same loop between stitches in the previous row. This would disrupt the flow of a traditional DBH shape, but it could produce some interesting effects, like ripples in the shape. If you want to try it, go for it, but if you're trying for a traditional look, keep the increases and decreases for the edges of the shape.

So, you've worked down to the widest part of the petal, just before it splits into the four points. What should we do now, you ask? The answer is to treat each of these points as a separate shape, and the last full row of DBH as the foundation row for the shape. Come up at the left side of the right-most point, and work into the loops between the stitches of the previous row.

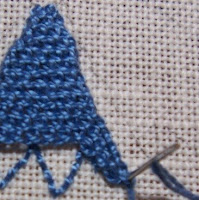
Keep working, filling in the right-most point. In these points, we need to start decreasing the number of stitches. To do this, just neglect to work into the first and last leg as needed. You may find you need to skip a first leg and add two on the last leg to hold the shape. This is completely fine! At the end of the point, make a tacking stitch or two to hold the last row in place.

When you're done with that point, sink the needle, bury the thread underneath this point on the reverse side, and come up again on the left side of the next point. Work this point the same way.

Continue working each point until the shape is filled.

If you decided to work a differently-shaped area, the method is the same. Figure out which side of the shape will serve as the foundation row, backstitch the entire shape, and begin working across the foundation row. Try to keep your lines of buttonhole straight. It might be tempting to follow the curve of the petal or leaf, but your stitches will start bunching up in the middle or spreading too far apart.

The leaf shape on the left was done in my Tudor Purse class with Chris Berry. See how the rows of stitches are straight across the shape? Note where the arrow is pointing. At that point, the third row of stitches has three stitches worked into the final leg of the second row. If you click on the picture, you'll clearly see that there appears to be a tiny gap there where you can see the outline stitch. This really doesn't matter when you realize the entire leaf is really only about 3/4 of an inch across. Nobody's going to be looking at any one leaf on a project that closely. I knew it was there and it took me a few seconds to find it when I went back to it!

On some shapes, you may find that both sides of the shape slant sharply to the left. To fill this, you'll need to increase multiple stitches on the left, and decrease on the right. This is OK. Don't try to pull the rows into the new position. Simply add more stitches to the first leg, and end the row on the right border, wherever it falls. You may need to tack some of the stitches on the right side. (Do I need a picture of this? Please let me know!)

Similarly, if the shape slants sharply to the right, you'll tack a few stitches on the previous row, then start working into the loops of the previous row where it makes sense. Add as many stitches as needed into the final leg of the previous row.

Hopefully you'll now be able to approach various shapes in detached buttonhole without worry. For the next stitch study, we'll learn how to do detached buttonhole with return, which makes a denser stitch with a lighter weight thread.

As always, please let me know if anything in this post needs clarification. I welcome any ideas for future stitch studies. Any type of stitch seen on my blog (counted, surface work, stumpwork, goldwork, canvas stitches, etc.) is fair play.

Tuesday, December 2, 2008

November recap, December goals

December already! Here were my goals for November:

  • Blog more. I managed 14 posts for the month, which ties for the most in a month this year! Not great, but better! I also kicked off a new "stitch study" series of posts.
  • Enjoy the My Way class. Yes, very much, although I missed one day.
  • Finish Jim Wurth's Peace Tree so I'll be ready to start the last ornament when it shows up this month. Yes! I finished it and the last ornament, Fabulous Finale.
  • Continue working on Summer Dream. Yes, though I didn't get as much done as I wanted.
  • Finish a few of the smaller WIPs kicking around here! Ummm... no.

I actually managed to get a bit of my excess stash up on eBay this month. I also started and almost finished Gay Ann Rogers's Challenge Ornament on Sunday, but I haven't had the chance to blog about that yet. Stay tuned!

******************************************
For December, here are my goals:

  • Continue with regular blogging, including the stitch study series.
  • Finish the Challenge Ornament.
  • Continue working on Summer Dream.
  • Finish a few of the smaller WIPs kicking around here.
  • Sell enough stash to afford the Judy Souliotis class starting soon on SNS!
  • Enjoy the holidays!

I'm looking forward to some extended time off from work at the end of the year to help with these goals.

Monday, December 1, 2008

I won!

This evening was our local EGA chapter's holiday party. Instead of doing a potluck dinner, for the last several years we've opted to go out to a nice restaurant and just enjoy each others' company. Tonight's dinner was at a locally-owned Italian restaurant. The food (capellini pomodoro for me) was delicious and the conversation quite varied and fun.

The highlight of the evening was the opportunity drawing. MIL, in her capacity as chairperson for "Ways and Means" (a.k.a. chapter fundraising), had put together a lovely holiday basket. Not expecting anything, since I never win these things, I donated my $5 for 6 tickets. Our waiter drew a ticket, and I was very pleasantly surprised! I can no longer say I never win! :-)

I brought the basket home, and Sophie seemed to approve (either that or she thought it smelled like Grandma).

So, what was in it, you ask? What better than stitching stash & chocolate? Specifically, several types of chocolate truffles and other such goodies, plus:

  • a "floss stick" to keep floss colors together for a project
  • a kit for a perforated paper snowman ornament
  • Christmas Keepsakes, a Leisure Arts book
  • A Potpourri of Pillows, a hardanger book by Janice Love
  • Gloriana angel chart by Just Nan
  • the chart for a small rustic Christmas sampler
  • instructions for a small angel doll ornament
  • a painted canvas for a Scottish nutcracker ornament
  • a kit for a Joan Thomasson Santa, complete with painted canvas, stitch guide, and all threads!
At this rate, I'm going to have to list a few more things on eBay if I'm really trying to reduce my stash! Not that I'm complaining... :-)