/** Google Analytics script below */ /** end Google Analytics script */

Thursday, December 31, 2009

Happy New Year 2010!


This year has flown! Here's what I finished in 2009:


A larger view of the slideshow can be seen here.

On January 1, 2009, I wrote some stitching & blogging goals for the year:
  1. Enjoy my stitching. Done!
  2. Keep blogging. Done!
  3. Try to finish a few WIPs, and end the year with fewer than I have now. (Unfortunately, I can't get an accurate count now, so I'll just have to count finishes vs. starts for the year!) Well, I finished 5 started in previous years, and only have 2 started and not finished for this year, so I guess that's progress!
  4. Start the whitework Frances Cheyney sampler from The Essamplaire. (This will be stitched as a SAL with a friend, and I had hoped to start it today, but it can wait.) Ummm.... No.
I'm hoping to get a bit more stitching done this upcoming year. My goals for 2010 (continuing a few from this past year) are:
  1. Enjoy my stitching.
  2. Keep blogging. (Actually, I have a few plans for the blog, but I'll go over these in a separate post in the next week or so.)
  3. Continue decreasing the WIP count! 
  4. Stitch Erin's First Christmas ornament and get it finished. (And maybe do one for the second year, too!)
  5. Finish my master craftsman piece on time.
  6. Start something by Jean Hilton.
  7. Start something by Gay Ann Rogers.
I'll stop now before I get myself into trouble. Enjoy 2010, everyone!

Wednesday, December 30, 2009

First Christmas Ornaments

MIL's:


Beautifully stitched and finished, hanging on our tree.

Mine:

That's right. Not even up on stretcher bars yet. I didn't even order it until the week of Thanksgiving. What kind of mom am I?

Never mind that it's not even going to be the next one I start. That honor is for my EGA master craftsman piece that's due the end of March. (Didn't I say recently that I try not to stitch for deadlines? So much for that idea.)

Hopefully I can get the first Christmas ornament done before next Christmas!

***************************************
A long-overdue Erin update: When we first learned of the difficulty with Erin's hips, I had hoped she'd be crawling by Christmas. And she was - backwards. For almost a month, she'd get up on hands and knees, look at something she wanted, and move away from it! Finally, on Christmas, she figured out how to move forward!

I'd like to ask a favor. Our local newspaper has a "Meet the Babies" section every year. The cutest baby (partially determined by online votes) wins a prize! If you're so inclined, please vote for Erin. Her picture (a cropped version of the photo below) should be up tomorrow (12/31). I'll update this post with a direct link once it's available.

It's up! You can vote here.


You can vote via your facebook account (if you have one) or by entering your email address. I've been assured by the newspaper that the email addresses are not being saved for any other use than to keep only one vote for each address for any given child. (You can vote for up to nine babies, but unfortunately you can't use all nine votes for one baby!)

Thanks! And if I don't post tomorrow, Happy New Year!

Friday, December 25, 2009

Monday, December 21, 2009

Dealing with deadlines

It seems that lately I've been working against a couple of deadlines. My stitching time (to say nothing of blogging time) has disappeared as I've been trying to bake, decorate, buy, wrap, and write cards in preparation for Christmas. I'm happy to say that the baking, cards, and buying are done, though I still have to finish some decorating and wrapping over the next few days!

When it comes to stitching, though, I try not to set deadlines. Occasionally I'll have one for finishing a correspondence course, but I haven't even been trying to meet those this year! I have a standing policy when stitching for gifts: if I'm making something for Mom for Christmas, there's nothing that says it has to be this Christmas. I'll give it to her for the Christmas after it gets finished. Of course, this doesn't work too well for wedding gifts, but it does work for birthdays and holidays.

I'm curious. Who else does this? Do you set deadlines for your stitching, or are you of the "it gets done when it gets done" mindset?

However, I do have a stitching deadline looming now. This one has nothing to do with Christmas. Rather it has everything to do with one week later. Recall that I've already added '2009' on my How Great the Blessing from Catherine Theron. See the arrow in the picture. I really don't want to pull it out, so I'm trying to finish by the end of the month. Fortunately, I've made decent progress since I last posted about this piece, and I'm on vacation for the rest of the year. I'm really hoping to make it!


Wednesday, December 16, 2009

She's done!


Yes. Cinders is done. While done with fairly basic blackwork and darning, stem, and satin stitches, this piece was quite challenging due to the format. As described in my first post about this piece, Marion encouraged us to change filling patterns and colors as we stitched.

I'm pleased with how my version came out. Here's Marion's original, for comparison. (Sorry about the flash. This is a photo of a photo.)

It's really interesting to compare and contrast these two versions. I've seen many instances where several people do the same counted canvas piece in a multitude of colors and threads (most recently on the website of Gay Ann Rogers), but I haven't seen it often in other techniques.

Have you seen other examples? Please tell us about them!

Monday, December 14, 2009

Drawing inspiration from reality

In my last post, I expressed my frustration with the small, even blocks in the background of Cinders. I thought that they should be more irregular, more in keeping with the actual construction of a medieval castle or manor house.

Edy commented, "Why not change the bricks into stones...a bit larger and not so regular...sort of like a stone wall? Just a suggestion, not that I'm one who should second guess Marion."

(Actually, based on the couple of classes I've had with Marion, I think she wouldn't mind being second-guessed. She, like most great teachers, encourages students to make a design their own.)

Regardless, I was already thinking along the same lines as Edy. Rather than potentially adding something more inauthentic, though, I turned to the internet. I learned that medieval construction did actually involve shaping roughly rectangular blocks out of rock, so I used Google Images to get some visual inspiration. Surprisingly, I found plenty of construction with small blocks, but rarely were these as evenly spaced as on the original Cinders.

Two images in particular helped me decide how to "build" the wall behind Cinderella. This photo shows that the blocks were often of similar heights, but surprisingly long blocks were interspersed with much shorter blocks. The front of this manor shows similar dissimilarities between blocks, and also shows that each row of blocks might be a different height than neighboring rows.

With the exception of the upper right corner, where I'm still ripping out the little blocks, I've applied these lessons to Cinders. After the upper right corner is done, I'll reevaluate to see if I need to fill in any of the blank areas.


I like the new look much better. Isn't it wonderful that we can do small research projects like this with a minimum of time thanks to the internet?

What about you?  Have you made changes to a project (or even designed your own project) based on images found online? How did it turn out?

Saturday, December 12, 2009

Slowly building a wall

This week has seen very little progress on stitching projects. Between the EGA holiday party Monday night and various Christmas preparations, I haven't had much time to stitch in the evenings after a certain little person goes to bed.

So what stitching did I get done this week? Besides finishing the hair on Cinders (thank you all for your comments, yes, the hair is done!), I've worked on a few of the small bricks in the background of the same piece.


Not very impressive, is it?

While it's true that I've been busy with other things, it's also true that I've been hesitant to stitch these bricks. I swear, I've never had more bouts of indecision on any piece than I have with Cinders. The wall is the very last part, and I'm bothered by it.

Why, you ask? Well, the story of Cinderella is in medieval times, so I'm guessing the hearth she's sitting at is in a castle, or at least a large manor house. Is it at all realistic for such a dwelling to be made up of tiny bricks, all set very evenly?

Am I taking things too far? I can hear some arguing, "C'mon. It's a fairy tale, already. Why should it be realistic?"

I should buckle down and finish stitching the silly little blocks, just to call this one done!

Thursday, December 10, 2009

Faith

Since May 2007, embroidery enthusiasts from around the world have been watching (via blog, of course!) the development of an embroidered jacket modeled after two examples from the 17th century. Along the way, the jacket acquired a name: "Faith", for the tremendous journey of faith it took for this vision to come to fruition.

Some details to consider:

  • The project involved almost 260 people, from stitchers (some experienced, some first-timers), to lace-makers, textile manufacturers, and coordinators.
  • Several 17th-century threads, such as Gilt Sylke Twist, were recreated for this project and are now in production again.
  • When Plimoth Plantation canceled the exhibit for which the jacket was being developed, the volunteer efforts continued, with the belief that the jacket would be completed and exhibited somewhere. (Hence the name "Faith"!)
Today is the day. Faith is being unveiled tonight at Plimoth Plantation, and on the Embroiderers' Story blog. She even made the front page of the Boston Globe's metro section.

If you're visiting the blog, start with this post, and check out the posts that follow it, too, for lots of pictures of this magnificent accomplishment. Be sure to click on the pictures to make them bigger. Some can be clicked twice to make them REALLY big. If the pictures on the blog whet your appetite, you may want to visit Winterthur Museum in Delaware sometime between spring 2010 and early 2012, where Faith will be on exhibit for all to see.

Congratulations to Tricia Wilson-Nguyen, who was the driving force behind the project, and to all those who had the wonderful experience of contributing to such an amazing piece of embroidery history.

Tuesday, December 8, 2009

Striking fear into a counted-thread lover's heart

Two words:  RANDOM and NATURAL.

Those two words are part of the reason that Cinders has lingered in the WIP pile. While most of the design is counted, her hair is not. The hair is stitched in three shades of DMC floche using stem stitch, and it's up to the stitcher to place those lines of stem stitch more or less randomly such that it looks natural. Aack!

I cheated a bit when I started. I looked at Marion's picture of the original, and I used a pencil to sketch in the general flow that would be stitched in the darkest shade. For subsequent rows of stem stitch, I've tried to keep  random and natural in mind. Yes, I ripped out a bit, but I think I'm done.

What do you think? Do I need to fill in any of the spaces? Does anything look really odd?


Monday, December 7, 2009

The wonders of a good sugar scrub

It happens every year, but I never notice it starting. It just seems that with the onset of the cold weather, suddenly my hands develop rough patches that catch on every thread that comes near.

My favorite solution is a sugar scrub, which works temporarily at least. Here's my (almost free!) version of expensive spa exfoliation treatments:

  1. Before sitting down to stitch, head for the kitchen. 
  2. Pull a bottle of oil out of the cupboard and take the cap off. (I like olive oil for the smell.)
  3. Take the lid off of the sugar canister.
  4. Turn on the faucet. (It's important to do steps 2-4 first because it's really hard to do any of this once you've started putting stuff in your hands!)
  5. Grab a teaspoon out of the silverware drawer.
  6. Use it to scoop out a heaping teaspoon of sugar, and dump this in your non-dominant hand.
  7. Pick up the bottle of oil, and pour a bit over the sugar in your hand. (You don't need much, but too much is better than not enough.)
  8. Rub your hands together. (I'm assuming you've put down the spoon and bottle by now.) Pay special attention to the rough spots.
  9. Rinse your hands.
  10. Wash your hands, then wash them again. Be sure to get all of the oil off before starting to stitch!
Enjoy your smooth, snag-free hands! I sometimes have to do this more than once a day, but it only takes a couple of minutes, and it costs a few pennies at most.

What's your solution to rough winter skin? Answer here in the comments, or on your own blog - but be sure to leave a note here so everyone knows to check yours!

Sunday, December 6, 2009

What would you like to see here? Reader survey, part 2

Thanks to those of you who responded to part 1 of my reader survey. Part 1 is here if you didn't get a chance to respond, or would like to see the responses thus far.

Since I started this blog in March 2007, several types of posts have been featured, including:

For lack of a better description, I'm trying to "build a better blog."  What would you like to see here? (Yes, that means you!) Some of the above posts, or something else? Is looking at my progress enough, or would you prefer more educational material?

I'll have one more "reader survey" post later this week. In the meantime, please take this opportunity to help me provide you with interesting and relevant content.

Thank you!

Saturday, December 5, 2009

Can you help restore a piece of history?


On Tuesday, December 3, Christie's auction house sold a piece of an antique jacket, seen above. While advertised as the sleeve of a jacket, this is actually the jacket's back. If you visit Christie's site, you can zoom in on a picture of this exquisite embroidery.

Unfortunately, it appears that somebody has intentionally disassembled this jacket and is selling the pieces individually to maximize profit. According to Tricia Wilson-Nguyen, a collector interested in re-assembling this piece of history purchased the front of the jacket in 2005, but was outbid at Tuesday's auction.

If you know the person who won this auction, please ask them to contact Tricia.

You can read Tricia's blog posts about this jacket here and here.

Friday, December 4, 2009

Cinders is getting there!


Despite getting sidetracked (why does this sound familiar?) with the green ornament, I have made a bit of progress since I last posted about Cinders, designed by Marion Scoular.

I have finally finished the bucket. (Or coal scuttle. Whatever.) After finally finding a stitch that could be shaded nicely to indicate a little pile of coal inside, I used the same dark gray to outline the back edge of the rim. Satin stitch in the darker brown lines the inside of the handle. The rest of the outlines on the bucket are in the same brown.

The rest of the outlines have been finished, also. These included the blue edge of her skirt above the cat's head, and the lower outlines of the hearth.

What's left, you ask? Only two things:
  • Adding many more small bricks in the upper half of the wall, although the entire wall will not be filled in.
  • Finishing her hair, which is stitched in stem stitch.  This won't be entirely filled in, either, but more strands are needed, especially between her shoulder and the top of her head.
Hopefully we'll all see it completed next week!

Thursday, December 3, 2009

Stitching Techniques - Reader Survey, part 1

The comments from Tuesday's post about the conclusion of my month-long WIP list were so varied and interesting!

Jocelyn said, "It drives me to distraction to have several pieces on the go at once. I like to work and work and work on one piece, then when it's finished, move on to the next."

I can understand that. The number of unfinished pieces around here drives me nuts sometimes. However, I often find that stitching on a single project to the exclusion of anything else does become "work and work and work"! Instead, variety (in techniques) keeps it interesting for me, much like it does for Cheryl, who said, "repetition of styles makes one feel like a one trick pony," and Donna, who commented, "I'm with you - I like variety."

Madonna (Front Range Stitcher) commented about "the depth and diversity of [my] stitching tastes."  Thanks! I'm constantly trying new techniques, because I firmly believe that each thing I learn in a given technique improves my stitching in all techniques. I can't think of a specific example, but I will often approach a project in one technique in a untraditional way due to something I learned while stitching something in a completely different technique. That's why my WIPs cover the gamut from stumpwork to counted canvas to hardanger, and then some.

So, what about you? What stitching techniques do you enjoy? Have you tried any new styles in the past year? Why or why not?

I encourage any and all of you to answer in the comments.  I'm attempting to improve the quality of my posts, and it really helps if I understand my audience.

I look forward to the discussion in the comments!

Wednesday, December 2, 2009

Happy Dance (and stitch guide): Green Ornament


Cross one off of the WIP list. This Kathy Schenkel ornament is done! Here's a stitch guide, if anybody's interested.

Green Areas:
Start with the rows of Bargello stitches. (If you're not familiar with Bargello, Wikipedia surprisingly has a decent overview.) For this ornament, the Bargello is completed with vertical stitches over 4 threads. Begin the bottom Bargello pattern where the lower green area meets the white central band, and just follow the pattern established by the painting. Use of a laying tool is recommended!
  • The first (inner-most) row is Kreinik 1/16" ribbon in color 009.
  • Below this is a row of Felicity's Garden #016, Evergreen, using two strands.
  • The third row is Vineyard Silk Classic #C-146, Cactus, using two strands.
  • Repeat this pattern for the subsequent rows.
  • When it's time to use the Kreinik ribbon for the third time, lengthen the stitches to cover the bottom of the ornament.
When the lower green section is done, turn the ornament 180 degrees and stitch the top the same way. End with the second row of Felicity's Garden. There's a tiny row of green unstitched, but that actually helps with working the gold top of the ornament.

Gold Ornament Top:
Using Kreinik #8 braid in color 002, fill this area with woven stitch. Work the stitch right over that first row of green intersections. This makes it look a bit like there are holes in the bottom of the ornament top, and the color of the ornament is showing through.

Note: This area is really hard to photograph, due to the gold metallic on top of gold metallic paint, but refer to the enhanced photograph at right to see the detail a bit better.

Central White band:
Using Rainbow Gallery's Patina #PA10 (one strand, right as it comes off the card), work this area in basketweave. Change the direction of the tent stitches in the diagonal areas between the petals of the poinsettias, so the stitches are angled away from the center.

Green lozenges:
Satin stitch the green lozenge-shaped areas with Kreinik 1/16" ribbon #009.

Poinsettias:
Each petal of the poinsettias is stitched in four parallel diagonal stitches over four intersections, using Rainbow Gallery's Petite Frosty Rays #PY072. A black seed bead is used over each of the four black intersections at the center of each flower.

Enjoy!

(Oh, and thanks to all who commented on the previous post. I'll be responding to some of the comments in tomorrow's post.)

Tuesday, December 1, 2009

WIP-list wrap-up

This past month, I've presented thirty of my works in progress. Aren't you glad that's over? I know I am!

I'm also glad that it was getting harder to find projects to present as the end of the month drew near, and to find that I only have a small handful of WIPs beyond this list. These include the Morning Glories temari and its companions, and SharonG's Tuscan Spring canvas, which is barely started. Other than these, there are only a couple of small pieces started as EGA programs in various techniques.

One of my observations during the course of the month was that I do not have any two WIPs from the same designer, other than my original designs. I think I stick to this because often there is a similarity in feel or technique within a given designer's works. If I get an urge to stitch something from a certain designer, I may just as well work on a piece already started from that designer. The funny thing is that I have nothing in progress from my two favorite designers (can you guess who?), likely because when I start one of their designs, I enjoy it so much that it gets done!

What about you? Do you find that you have multiple projects going from a single designer? Why or why not?

Monday, November 30, 2009

WIP: Blue Hardanger (original)

Hooray! It's November 30! I made it through NaBloPoMo, though it was a close call with a late post yesterday. Time for one last featured WIP. It is another original design that I refer to as the Blue Hardanger.


Technique/Materials:  Hardanger on 25ct lugana.  The kloster blocks and buttonhole are stitched in Caron's Watercolours.  The rest of the stitching is in pearl cotton.

Background:  I think I started this around 8 years ago. Unlike the pastel hardanger, I started working this one from the inside out. I figured out the octagon shape, then created a nine-patch of octagons, figuring out the outside border after that.

Why it's not done:  I really hate sounding like a broke record, so you can fill in the blanks. Worked in-hand, nerve problems, yada yada.

What's left to do:  The remaining buttonhole around the outside, and all of the filling stitches, both the dove's eyes and needleweaving inside the octagon shapes and the larger blocks that will allow for fancier stitches.

Sunday, November 29, 2009

WIP: Angel of the Sea (by Lavender & Lace)

Today's featured WIP is Angel of the Sea by Marilyn Leavitt-Imblum of Lavender & Lace.


Technique/Materials:  Cross stitch on 32ct linen with cotton floss, metallic braid, and beads.

Background:  This was originally intended as a gift for a friend after the birth of her first baby. I think that baby is now 7 or 8. Ooops!

Why it's not done:  I've had this project mounted on a floor stand since I started it. The floor stand, given to me, has legs on both ends, so it's designed to straddle the stitcher's chair. Up until 2 years ago, my main stitching chair was a "chair and a half" similar to the one seen here. Of course, the floor stand wouldn't fit over this, so I had to use it in another room, which didn't have good lighting for stitching. As a result, I've stitched this only on sunny evenings and weekends, and not at all in the past year (though it's remained set up in my living room with a towel draped over it!).

What's left to do:  The bottom of the skirt and all of the waves.

Saturday, November 28, 2009

WIP: Drawn Thread Sampler #2 (by Jonalene Gutwein)

Today's featured WIP is Jonalene Gutwein's Drawn Thread Sampler #2.


Technique/Materials:  Cross stitch and drawn thread (obviously!) with cotton and linen threads on 28ct linen.

Background:  This sampler is a retired correspondence course from EGA. I took the course in 2002 or 2003 with the CyberStitchers chapter. I changed the color of the cross stitched areas from the original, but I don't think I planned any other changes. The picture here is of Jonalene's original.

Why it's not done:  I think I wasn't happy with the way it was coming out. I didn't like the brown color I had chosen. The knots seemed to keep slipping in the drawn thread areas. I think I just became frustrated and set it aside.

What's left to do:  The bottom three-quarters of the sampler, plus the butterfly in the upper left corner and the hemstitch all the way around.

Friday, November 27, 2009

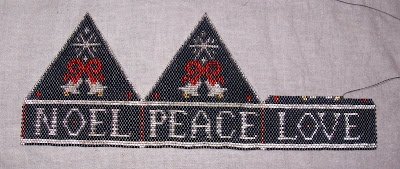
WIP: Silver Bells (by Blue Bear Beads)

Today's WIP showcases yet another technique. It is Silver Bells, designed by Dawn Dalto of Blue Bear Beads.


Technique/Materials:  Peyote and brick stitch beading using Delica beads, with a spiral beaded cord for a hanger.

Background:  In 2001, I attended the now-defunct CATS (Creative Arts and Textiles Show) in Hershey, PA. While there, I took Dawn Dalto's White Christmas ornament class, and purchased the pattern for this ornament. The assembly for both is the same. I think I finished White Christmas that  year, but I didn't start Silver Bells until over a year later, in 2003.

Why it's not done:  Unfortunately, it was around 2003 when I started having flare-ups with a pinched nerve in my neck that caused numbness in my right hand whenever I did "in-hand" work. (Yup. Whenever I dropped my head and raised my shoulder, within a few minutes the first three fingers of my right hand would go numb. After consulting a neurologist and an MRI, I was given the brilliant conclusion of "it must just be positional", since they didn't see the pinch on the MRI. Umm... yeah. Hence, I don't do much in-hand work these days. My lap stand is used for everything.)

What's left to do:  After the remaining four peaks are completed, I'll join the end of "Love" to the beginning of "Noel," then stitch the peaks together. The stuffing will be inserted before the last side is sewn shut. Then, I'll add the beaded cord. (Of course, I can only work on this if I haven't had a nerve flare-up in a while, and then it might only be for 30 minutes or so.)

Thursday, November 26, 2009

WIP: Delicate Flowers (by Pat Mazu)

Before I jump in to this post, please let me wish each and every one of you (or at least, those here in the US) a very Happy Thanksgiving!

Oddly enough, my featured WIP of the day is a miniature Christmas stocking. It is Delicate Flowers, designed by Pat Mazu.


Technique/Materials:  Various canvaswork stitches on green 18ct mono canvas using silk threads.

Background: This project is from the 2003 ANG Chapter Project Book. As the name indicates, this is a book of small projects for chapters to use as programs for meetings. Our chapter did this project as a program sometime in 2004 or 2005. As usual, I changed all the colors around from the original.

Why it's not done: I had trouble determining exactly what colors to make the flowers in the bottom portion of the stocking. I thought that they should look like poinsettias, which is why I was leaning toward the burgundy. In the upper left, I tried this color in one position, with a lighter pink in the center of each flower. I realized that this didn't look like poinsettias at all, so I tried the burgundy in the more dominant center, as seen in the lower right. At some point, it became obvious that the pink was just too much of a contrast, so I needed to find something a bit darker. Somehow it sat like that for a while, and eventually found its way into the neglected projects corner!

What's left to do:  All of the flowers in the bottom, and metallic accents throughout. As I'm working the flowers, I also have to figure out how to tie off all the ends of the green threads at the bottom. Yes, it looks like a mess of ends because it is! There's just no way to bury the ends of the grid threads until after the flowers are stitched. I did a few pinhead stitches, but I like to bury a thread under at least a couple of stitches so the pinheads can't work free.

Wednesday, November 25, 2009

WIP: A Case for Color (by Marilyn Bedford)

Today's featured WIP is a needlebook called A Case for Color, designed by Marilyn Bedford.


Technique/Materials:  Various Bargello motifs in silk thread (Waterlilies and Hand-Dyed Fibers) on a hand-dyed 32ct linen.

Background:  If I recall correctly, one of the members of our local EGA chapter had taken this class several years ago at a regional mini-seminar known as "Little Stitches". This seminar specifically only recruits teachers from within the region, to encourage new and aspiring designers and teachers. Several of us had seen the resultant needlecase that came from this class, so when Marilyn Bedford came into town for a region meeting in October 2008, we asked her to stay for an extra day to teach this class.

This was another project for which each student chose her own colors. In addition, students could place the various motifs anywhere within the cover area, though some are duplicating the original layout. I chose to make my needlebook slightly smaller than the original, so I've needed to rearrange and crop some of the motifs make them fit. Fortunately, it's very easy to do this in Bargello!

Why it's not done:  This was set aside when I started My Way and Summer Dream last November. I actually did work on it a bit during Erin's first surgery, but it didn't "stick."

What's left to do:  Filling in most of the empty areas with additional motifs, and then turning it into a needlebook.

Tuesday, November 24, 2009

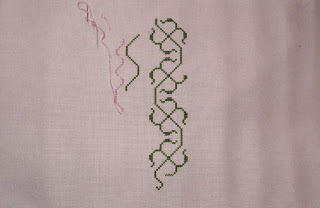
WIP: Blackwork Band Sampler (by Moss Creek Designs)

Yes, today's featured WIP is another band sampler. Specifically, it is the Blackwork Band Sampler by Rae Iverson of Moss Creek Designs.


Technique/Materials:  Blackwork (double running stitch) central bands with a cutwork border entwined with a vine adorned with flowers and leaves in various other stitches. The only non-blackwork band is a cutwork area for the stitcher's initials. It is stitched with cotton and silk flosses with accents of metallic threads on 28ct linen.

Background:  I'd guess I started this project in 2004 or 2005 (though it could have been earlier). It's another one that was a lunchtime project, so it only saw 15 minutes of attention a couple of times a week (on a good week).

Why it's not done:  When I changed jobs three years ago, this project came home and hasn't been touched since. I don't know why it didn't find its way into my new desk.

What's left to do:  I've finished about one-third of the blackwork bands, and only a tiny bit of the border. I've got to do all of the cutwork, both in the border and the initials band, in addition to finishing the vine, flowers, leaves, and blackwork bands.

Monday, November 23, 2009

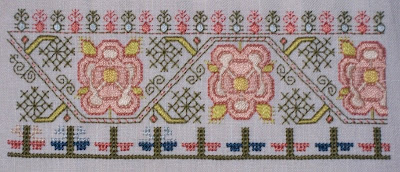
WIP: Ukrainian Openwork Sampler (elements by Jan Walters)

Today's featured WIP is a sampler in Ukrainian Openwork. The individual bands were all designed by Jan Walters, but the arrangement of bands is my own.


Technique/Materials:  Ukrainian Openwork (primarily consisting of satin stitches and drawn and pulled thread work) in DMC coton a broder threads on 25ct Pearl Linen (which is a polyester/linen blend).

Background:  I took the EGA correspondence course in Ukrainian Openwork with the CyberStitchers chapter in 2004. For my critique, I stitched a table runner, but I could only put one main band design on that runner. I really wanted to try the other larger bands, so I decided to start a sampler of them.

Why it's not done:  I have no idea what made this project land in the "someday" box, since this was pre-blog and I didn't keep any records of my progress (or lack thereof) at that time. I assume I was just tired of stitching white and went on to something else that caught my eye.

What's left to do:  I'm not really sure. It's been so long since I looked at the course text, I couldn't tell you what bands I planned to do, although the picture roughly shows the entire design area (assuming an equal fabric margin on all sides of the design).

Sunday, November 22, 2009

WIP: Picnic Hampered! (by Kathy Fenchel)

Today's featured WIP is Picnic Hampered!, designed by Kathy Fenchel.


Technique/Materials:  This piece uses traditional needlepoint stitches combined with surface embroidery and stumpwork techniques. It is stitched on Congress cloth, primarily with cotton threads.

Background:  Kathy Fenchel taught this project at our regional EGA seminar in May 2007. I am stitching it primarily as designed, although I added some felt padding to the random surface embroidery used for the tree. I really like the creative use of a plastic washer, covered with buttonhole stitch, for the tire swing.

Why it's not done:  After a little over a month, during which I was also working on another piece from the same seminar, this was set aside so I could concentrate on a correspondence course that needed to be finished. This project is the only canvaswork WIP in the collection that is no longer on its stretcher bars, since those were needed for another project at some point! 

What's left to do: The picnic blanket and the tree both need to be finished, and the tire swing attached. I'll need to add the "visitors" (bees and ants), the fence and sunflower in the background, and finish off with a sprinkling of grass.

Saturday, November 21, 2009

WIP: Summer Dream (by Luan Callery)

Today's featured WIP is no stranger to long-time readers. It is Luan Callery's Summer Dream.


Technique/Materials:  Stumpwork and surface work on linen twill, primarily using wool and cotton threads.

Background:  I took this EGA correspondence course with a group from my local EGA chapter. According to last year's blog posts, I started this in early November 2008 with the plan that it would be turned in for evaluation in January. As a result, this saw a lot of activity that month.

Why it's not done:  This was set aside in early December 2008 when I won the opportunity basket containing Celebration Santa and realized that there was no way I'd be finishing Summer Dream by January anyway. Besides being on bedrest (and later, in the hospital), I outgrew this project, on its large stretcher bars, as my lap disappeared with advancing pregnancy. The project bag found its way into storage, and there it has remained, until today.

What's left to do: I'm changing the colors of the main flower and the butterfly from pinks to oranges and yellows. In addition, I still need to stitch the smaller flowers - and the ladybug!

Friday, November 20, 2009

WIP: King's Highway Sampler (original)

The second of my three self-designed WIPs is featured today. It is a sampler of canvas stitches in the form of the traditional quilt pattern King's Highway.


Technique/Materials:  A variety of threads (including Very Velvet, metallic braid, Flair, pearl cotton, Pebbly Pearl, and overdyed wool) on 18ct mono canvas. The sampler is symmetric in terms of which stitch is used in each quadrant, except for the four large red areas. In these areas, I stitched different variations of a trellis stitch, using various metallic and matte threads (and beads in one of the areas).

Background:  Sometime in 2007 (I think), my ANG chapter started an ongoing stitch-of-the-month mini-program. Each month, a different member would present a stitch (his or her own choice), demonstrating it, handing out instructions, and discussing tips and tricks to working the stitch. We were all encouraged to start our own stitch notebook or sampler. This design is my sampler. I wanted to let the texture of the individual stitches stand out, so I chose a very limited color palette of dark red, green, royal blue, and oatmeal. I didn't know which blocks I would be stitching in a given month. When the stitch was presented, I then decided what threads I had that would work with that stitch, and that helped determine where the stitch would be used in the design.

Why it's not done:  I had started out well, keeping up with the monthly stitches so I'd be able to start the next block during the ANG meeting at which it was presented. After a few months, though, somehow I slipped up on this cadence, and it snowballed from there. At this point, when I pick it up again I'll likely just grab a convenient stitch book, close my eyes, and flip through the pages. When the pages stop flipping, I'll put my finger on a page, and use that stitch as my next stitch, then figure out where it goes and with which thread.

What's left to do: All of the unstitched blocks! This piece is only about 8" square, though, so it really shouldn't take a terribly long time.

Thursday, November 19, 2009

WIP: Japanese Octagon Box (by Chatelaine Designs)

Today's featured WIP is the Japanese Octagon Box by Martina Weber of Chatelaine Designs.


Technique/Materials:  Mostly cross stitch with a few specialty stitches, along with beads and crystals. I'm using the variegated silks specified in the pattern, though I substituted Vicki Clayton's silks for the more pricey Needlepoint Inc silks. The fabric is a standard color of 32ct Belfast, though I couldn't tell you now what specific color it is.

Background:  This was started with the online class in early 2006, and I was really enjoying it. I even picked up the finishing kit when it came out.

Why it's not done:  According to this blog post, I set it aside to work on some GCC's (and, likely, some of the Jim Wurth ornaments that were showing up every other month). As you can see, I haven't touched it since March 2007!

What's left to do: Well, only two of the eight panels are complete (or nearly complete), plus I have to do the top, bottom, and scissors sheath, and then assemble the whole thing. Looking at cathymk's pics makes me want to set everything else aside and get it done, but I know that's not in the plan. There are other things I want to get done first!

Wednesday, November 18, 2009

WIP: Blackberries (by Gitta's)

My only current silk gauze project is today's featured WIP. It is Blackberries, designed by Gitta's.


Technique/Materials:  Basketweave and continental stitch on 40ct silk gauze using Eterna stranded silk. (Be aware that if you're thinking of purchasing it, the kit does NOT come with 40ct gauze or silk thread. It comes with 23ct gauze or cordova canvas and cotton floss. I purchased the chart and found my own supplies.)

Background:  I started this in May 2007 (Hooray! I can remember this one!) when my EGA chapter held a workshop on how to mount silk gauze on muslin so it could be easily held with scroll rods or another type of frame. I had previously stitched another of Gitta's gorgeous designs on silk gauze, and loved how it came out. (And apparently some of the folks at ANG National Seminar did, too! I'm still in shock, over one year later!)

Why it's not done:  At the time I started this, I didn't have a full-spectrum lamp. My stitching lamp at the time was bright, but it still wasn't great for working on silk gauze. I could really only work on this during the day. Now, I've got a better lamp, but this piece hasn't found its place in my current active WIP pile.

What's left to do: Quite a lot, I'm afraid, based on the picture of the full design. Maybe this one will see more progress in the next year.

Tuesday, November 17, 2009

WIP: Armenian lace doily edging (by Elena Dickson)

Today's featured WIP is a bit of a departure. It is the edging on a doily, using the techniques and a design found in the book Knotted Lace in the Eastern Mediterranean Tradition by Elena Dickson. **Update: Since the Amazon price is so high, I went looking for an alternate source, in case anybody was interested in this book. Abe Books has links to several booksellers with much lower prices.**


Technique/Materials:  This edging consists of loops of thread in between knots, worked around and around the pre-made doily. The design develops in the spacing of the knots into the previous rows.  The thread is DMC Cordonnet.

Background:  I really don't recall when I started this. My edition of the book was published in 1999, so it was sometime in the past ten years. This is another travel project.

Why it's not done:  It's really pretty, but doing row upon row of knots gets a little tedious. Never mind that it is "in hand" work, with all of the issues I've got with it.

What's left to do:  Lots more knots. Here's what the completed edging is supposed to look like.

Maybe it'll happen sometime in the next ten years.

Monday, November 16, 2009

WIP: Heirloom Anniversary Sampler (by Victoria Sampler)

Yet another sampler is today's featured WIP. It is the Heirloom Anniversary Sampler designed by Thea Dueck of The Victoria Sampler. I'm stitching this as our wedding sampler, although I could have used it as our 10th anniversary sampler this year! :-(


(My apologies for the awful photo. I'll try to get a better one in the sunlight this weekend.)

Technique/Materials:  Lots of different sampler stitches, including drawn-thread work, pulled work, silk ribbon embroidery, and hardanger with silk threads on 28ct platinum Cashel linen.

Background:  I think I started this in early 2000, shortly after we got married in the fall of 1999, with the aim of making this our wedding sampler. Instead of a number inside the silk ribbon heart at the top, I'm planning to put the initial of our last name. As usual, I had to make the original design more complex by combining the big sampler with the hardanger border shown on the small design on the back of the chart.

Why it's not done:  Same old story, with respect to the hardanger. The carpal tunnel and the pinched nerve in my neck act up with the needle weaving. I also haven't found a great monogram alphabet to add our initial in the heart at the top.

What's left to do: I've just got to finish the rest of the hardanger border, then add a monogram in surface embroidery inside the heart.

Sunday, November 15, 2009

WIP: Overture II (by Kay Stanis)

Today's featured WIP is Overture II, designed by Kay Stanis.


Technique/Materials:  Silk and metal embroidery on congress cloth. The border stitch is a counted couching technique using flat Japanese silk (not fun with winter-rough hands!) and metallic braid. The remainder of the design, except for the background, is done in non-counted techniques.

Background:  This was one of two one-day classes taught by Kay when she visited our ANG chapter in August 2006. (The other was Prelude, which I finished within a few months.)

Why it's not done:  While I was finishing Prelude, this piece was set aside, and by the time I got back to this, winter had set in, and my hands couldn't handle the silk. In the three years since, I haven't remembered to start working on it again!

What's left to do: Most of it, unfortunately. It really isn't a large piece though (about 5" x 7"), so it shouldn't take too terribly long, once I pick it up again - after this winter.

Saturday, November 14, 2009

WIP: Green Ornament (from Kathy Schenkel)

I think I actually have fewer stitches in today's WIP than yesterday's, but I've got more of the piece completed.  This is a rare small project for me.  Today's featured WIP is a handpainted canvas ornament from Kathy Schenkel.


Technique/Materials:  Various (mostly yet undetermined) stitches on handpainted 18ct mono canvas. I've pulled a bunch of appropriate threads from my stash. So far, I'm using Felicity's Garden (a thread I've never used before, only have one skein of, and it happens to be a perfect dark green), Vineyard Silk, and Kreinik 1/16" ribbon.

Background:  I picked this canvas up last year when my LNS hosted a Kathy Schenkel trunk show. When contemplating what stitches to use, the scalloped area just cried out to be stitched in Bargello, so that's where I started! I'm not sure what I'm doing for the rest yet.

Why it's not done:  This is another "desk" project, and I don't often pull it out at lunch. If I do, it only gets about ten minutes of attention. Never mind this sat in my desk for four months while I was out on bedrest/maternity leave last winter.

What's left to do:  The rest of the Bargello, the center band, and the gold ornament top. Now that I've brought it home to photograph it, I may just spend a couple of evenings finishing it.

****************************
A long-overdue Erin update:  On Halloween, I posted pictures of Erin in her jack o'lantern costume, but I neglected to mention that she decided to try to complete the outfit by cutting her first tooth that day. Now, that tooth is becoming visible in pictures.

Her new favorite pastime is pulling off her socks.

But like mommy, she can sometimes be distracted by fabric textures.

Friday, November 13, 2009

WIP: Remember Me Photo Album (by Indigo Rose)

Today's featured WIP is likely the one that's got the least amount of stitching complete. It is the Remember Me Photo Album by Catherine Strickler of Indigo Rose. Isn't it pathetic that I only made it this far before putting this aside?


Technique/Materials:  This photo album cover (and yes, the kit came with the album) is worked on 28ct evenweave with two strands of cotton floss. Not having the instructions in front of me right now, I can't be sure, but I believe most of the stitching is in cross stitch, though there may be a few other stitches here and there.

Background:  I'm not really sure when I started this. I think it was shortly after the design came out, and since Catherine's original had a date of 2003, I'm guessing I started in 2004. Since I never bothered to mount this on a frame/hoop/Q-snap or any such thing, I'm sure this was started as either a desk project (for stitching during my lunch hour) or a travel project. As such a project, it only saw hit-or-miss progress, which accounts for how little is completed.

Why it's not done:  Have I ever mentioned that I really don't like to work on 28ct? I really don't. On 28ct, you have to use at least 2 strands of cotton floss, and then you have to lay each stitch to get halfway decent coverage. Of course, this is much easier if the fabric is mounted on some sort of frame and in a stand, so you can use a laying tool. Trying to stitch on 28ct in hand is a pain. (Yes, I know about railroading. I never have good results with it, because one strand eventually overtwists and the other undertwists on me, so I don't use this technique. If it works for you, please share your secret!)

What's left to do:  Just about everything. Fortunately this piece isn't huge, and if I actually mount the fabric on a frame of some sort, it shouldn't take too long to do.

Thursday, November 12, 2009

WIP: Be You to Others Sampler (Hillside Samplings)

Today's featured WIP is the Be You to Others Sampler, designed by Leslie Rudnicki of Hillside Samplings.


Technique/Materials:  This sampler is primarily cross stitch, with a few other stitches (satin, smyrna, herringbone, eyelets) thrown in as a change of pace. I'm working it on an unnamed color of 36ct Lakeside Linen received during a Fabric of the Month club several years ago. Most of the threads are Hand-Dyed Fibers from Vicki Clayton.

Background:  I picked up this piece in the summer of 2007 when I was looking for a project that wouldn't take tons of concentration when I was stitching with a group. In my stitching group, this quickly became known as the Ninja Squirrel Sampler due to the fact that the squirrels on it are as big as the little Adam and Eve in the center of the sampler.

Why it's not done:  It turns out that I like pieces that require concentration, at least most of the time!  That's not the only reason this hasn't seen more progress, though. The other reason is that the fabric seems flimsy and too soft. It's strange, because I've used 36ct Lakeside before and didn't have this problem. With this piece, though, I have to be more vigilant than usual about my tension, because the fabric threads distort very easily, especially with satin stitch.

What's left to do:  This is another sampler that still has a looong way to go.

Wednesday, November 11, 2009

WIP: Fans & Tassels Kimono (by Sophia Designs)

Continuing the Japanese theme from yesterday, today's featured WIP is the Fans and Tassels Kimono, a handpainted canvas from Sophia Designs. At least, that was the name I found on one website. I usually just think of it as "the red kimono".


Technique/Materials:  The kimono is a handpainted design on 18ct mono canvas.  It is stitched primarily in silks and metallics, including Japan gold threads, with some beaded touches.

Background:  This piece was started in August 2005 during a canvas enhancement class with Brenda Hart, who was brought into town by my local ANG chapter. Brenda helped me with a stitch guide for most of the major sections of the canvas, and I love how it's come out so far. (I've posted before about this piece. Check out the first four results from that link.)

Of course, I always have to make things more complicated than they need to be. Since kimonos are typically shown with motifs in Traditional Japanese Embroidery, and that style often has couched areas of Japan gold threads, I decided that the tassels and the gold outlines of this design should be couched Japanese gold. I'm going all the way - right down to stitching the gold in pairs and using the traditional koma (spools) to hold the thread while stitching.

Why it's not done:  That's a lot of couching, which can sometimes make my carpal tunnel syndrome flare up. (Wow. It seems like this is a common theme. Maybe I should actually suck it up and get this fixed!)

What's left to do:  The couching, which I estimate will take at least 30 hours. But it will be stunning when it's done, if I say so myself.

Tuesday, November 10, 2009

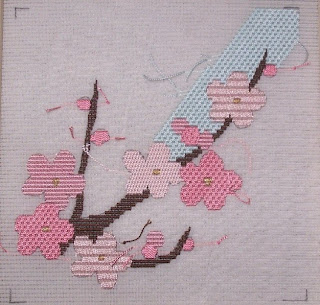
WIP: Plum Blossoms (by Margaret Kinsey)

Today's featured WIP is Plum Blossoms, an EGA Correspondence Course designed by Margaret Kinsey.


Technique/Materials:  This is a Japanese technique called Rozashi. This technique involves all vertical stitches on Ro fabric, which is a unique weave consisting of approximately 40 holes to the inch horizontally and 13 holes to the inch vertically. Most of the threads are twisted silks, but one is a silk twisted with a metallic thread, and one is gold metallic. In a very brief search, I found one website with a brief overview of Rozashi. The ANG website has an article with even more information.

Background:  I believe I started this three or four years ago as a course with the CyberStitchers chapter of EGA. The kit came with the fabric pasted very tautly (using a traditional rice paste) to the stretcher bars.

Why it's not done:  This is going to sound like the dumbest excuse in the book. I've already mentioned the tautness of the fabric. The kit also came with a handmade Japanese needle, which has a round eye designed to work really well with the twisted silks. As with any embroidery technique, the purpose of the needle is to open up the holes in the fabric to minimize abrasion on the thread. Well, when you combine really taut fabric with a needle that's a tiny bit bigger than the holes in that fabric, you end up with a pretty loud squeak every time the needle is passed through the fabric. It drove DH nuts. I ended up working on this when he went to his weekly dart league. When the dart season ended that year, Plum Blossoms faded into obscurity. (See? I told you it was dumb! Feel free to post your dumbest WIP excuse in the comments so we can all have a laugh and I can feel better.)

What's left to do:  The only thing left is the background! The first piece of good news is that I've again signed up for this course through CyberStitchers, so I have a second chance to submit the project for evaluation next year. This is good incentive! The second bit of good news is that we're in the middle of another dart season. Hmm... perhaps Wednesday evenings will find another WIP in the mix!

Monday, November 9, 2009

WIP: Nameless hardanger #1 (original)

Today's featured WIP is one of my two nameless hardanger pieces.  Yes, it's an original, and I refer to this one as the "pastel hardanger."


Technique/Materials:  Hardanger on 25ct lugana.  Most of the kloster blocks and buttonhole are stitched in Caron's Watercolours.  The rest of the stitching is in pearl cotton.

Background:  This was started 9 or 10(!) years ago.  I only recall when because it was before we purchased our house.  I didn't chart this out at all before starting.  I started with a piece of fabric and started stitching kloster blocks at one end in a more-or-less random zigzag to the halfway point of the fabric, then mirrored that pattern to the other end, and again down the other side.  I think I then charted out the result and played with different possible divisions and fillings.  I still haven't figured out what goes into the three small areas at each end and the two tiny areas on each side.

Why it's not done:  I really like the way this is coming out, but I can only do the needle weaving in very brief stints due to carpal tunnel and other nerve issues.  I can't do any "in hand" work these days.  As a result, this piece only sees very brief activity every once in a while.

What's left to do:  The rest of the filling stitches, and then figuring out what to put in the little areas.  Any ideas?

Sunday, November 8, 2009

WIP: Martha Willkins (from The Scarlet Letter)

Another reproduction sampler is today's featured WIP.  The Scarlet Letter reproduced the 1699 sampler of Martha Willkins.  Actually, I should say that most of the original sampler was charted.  If you look at the original, you'll see that SL left off the cutwork portion.  Whatever.  I still think it's lovely.


Technique/Materials: 17th-century sampler stitches over 2 on a higher-count linen with silk threads, mostly Soie d'Alger from Au ver a Soie.  I think the fabric is 34ct Oaten Scone from Legacy Linen.

Background:  I'm not really sure when I started this.  I think it was around 4 or 5 years ago.  I recall that it was a toss-up between starting this piece and Margret Gatis, also from the Scarlet Letter.  I decided to start Martha mostly because the entire piece is charted over two threads of linen, whereas Margret has some areas of over-2 and other areas over-3.

Why it's not done: I'm sure it was just a matter that other things caught my eye.  I've picked this up a couple of times over the past two years, according to past blog posts, but I haven't really committed to it.

What's left to do:  Most of it. I'm a little less than 1/4 finished.

Saturday, November 7, 2009

WIP: My Way (by Carolyn Mitchell)

Today's featured WIP is no stranger to my blog. It is Carolyn Mitchell's My Way.


Technique/Materials: Counted canvaswork on 18ct mono canvas, using many different threads in three color families (cranberry, teal, and gray-blue).

Background: Long-time readers may recall that I started this project when my LNS brought Carolyn Mitchell in to teach last November (2008). The class was specifically structured such that each stitcher could truly call the finished piece MY Way. Each of us chose our own colors. Specific threads were called out in each section, but in some cases, those threads were not available in the color family specified, so the student's creativity was needed, either to change the order of colors or to substitute other threads. Additionally, we could choose from seven blocks, and could position them as desired.  One stitcher even chose to make this a nine-patch design, rather than just six, and will be reusing two squares with different colors and threads.

I just discovered that Carolyn has pictures of finished My Way projects from 19 different stitchers (including herself) on her website.  Scroll down on this page to the listing for My Way.  (While on that page, you can also see Mystique, the class I'll be taking next September.)

Why it's not done: This piece was put by the wayside as my pregnancy advanced last winter, since I couldn't manage such large stretcher bars on my lap stand as my lap disappeared!  I've since picked it up and have made some progress, completing the centers of each of the six squares, but it was again set aside last month when my fellow ANG members voted on another piece to be my "challenge UFO".

What's left to do:  I have a few more decisions to make on two of the squares (the bottom center and right squares in the picture), and then I can replicate the corners and sides throughout.  After that, it's just a matter of adding a little bit of emphasis on each of the border intersections.

Friday, November 6, 2009

WIP: Rose's Pyramid (by Marsha Papay-Gomola)

Today's featured WIP is Rose's Pyramid, designed by Marsha Papay-Gomola.


Technique/Materials: Stumpwork on silk dupioni, using a variety of threads, including DMC and Anchor flosses, Silk 'N Colors from the Thread Gatherer, and Gentle Art Sampler Threads.

Background: I started Rose's Pyramid in November 2004 (or was it 2003?) during a class with Marsha hosted by my local EGA chapter. This class was my first attempt at stumpwork, and, to be honest, I was a bit intimidated, being a counted-thread girl at heart. Then I reminded myself: It's just string! Once I relaxed a bit, I found my stitching coming much easier.

Marsha was a great teacher. The majority of the two-day class was spent learning the stumpwork techniques, with an hour or so reserved for the finishing instructions. I don't remember exactly how to put it together, but the written instructions seem to be fairly complete, especially with the addition of my notes.

Why it's not done:  I'm not really sure. It may have been my master's degree program, or a bit of frustration with the amount of stitching needed to do long-and-short stitch with one strand of floss, or a flare-up of a pinched nerve. Or a combination of all of these!

What's left to do:  I think the sides of the pyramid with the wisteria and the fuchsia are done, but I still have to finish the sides with the grapes and the lilacs. For the center block, I still need to stitch tendrils and the ladybug and attach beads. I have 5 detached petals and 2 detached leaves to stitch, and then need to attach all of the detached elements to the center block, also.

Of course, then I need to assemble the pyramid!

Thursday, November 5, 2009

WIP: Hannah Thornbush (by The Essamplaire)

Today's featured WIP is the Hannah Thornbush sampler, reproduced by Margriet Hogue of The Essamplaire.


Technique/Materials: Various sampler stitches (double running, marking cross, satin stitch, detached buttonhole, and many more I haven't gotten to yet!) on 45ct linen (over 3) using Soie d'Alger and Soie d'Paris silks.

Background:  I started Hannah in June 2009 as part of an online class from The Essamplaire, after seeing a picture of the original sampler. What can I say? I'm a glutton for punishment.

Why it's not done: I managed to stitch the first monthly lesson (the first two bands) in just over a month. After that, lack of sleep (from Erin's adjusting to the cast) proved to be non-conducive to concentrating on stitching over-3 on 45ct!

What's left to do:  Um... did you see the picture of the original?

Wednesday, November 4, 2009

WIP: Celebration Santa (by Joan Thomasson)

Today, I'm featuring a hand-painted canvas WIP, Joan Thomasson's Celebration Santa.


Technique/Materials:  Various canvaswork stitches on hand-painted 18ct mono canvas using some charms and a variety of threads:  DMC floss and Medici wool, Kreinik braids, Needle Necessities and ThreadworX overdyed floss, Thread Gatherer's Shepherd's Silk, Silk 'n Ribbon, and Poodle Cuts, and strips of ultrasuede. I'm primarily following the stitch guide that came with the kitted project, though I am making a few minor changes in both stitches and threads.

Background:  At our EGA chapter's holiday dinner in early December 2008, I won the "opportunity basket." This kit was one of the items in the basket. When I ended up on bedrest for my pregnancy later that same week, I decided I needed to start something new. Since I wasn't able to get into the Christmas spirit by decorating my home, I chose this project as my new start. I made good progress in the following three weeks, until I ended up on bedrest in the hospital. Late in January (still in the hospital), my DH brought this project to me, but advancing pregnancy and almost 5 weeks of solid stitching were causing my carpal tunnel to flare up, and I wasn't able to stitch on it much.

Why it's not done:  Within a week of DH bringing this project into the hospital, we found another full-time diversion: a 4lb, 2oz, five-weeks-premature baby. Enough said!

What's left to do:  Finishing the background, stitching a second layer on the tree for a "real" look, couching Poodle Cuts for Santa's beard, adding turkey work for the fur (can you believe I've never done turkey work?), putting finishing touches on his coat, robe, and boots, and stitching his staff. Regarding the staff:  the stitch guide says to find a twig and attach it, or to stitch the staff in long-and-short stitches.  I don't want to use a twig, but I want the dimension, so I'm going to use Casalguidi stitch (also known as padded stem stitch) in a brown overdyed floss.

I somehow doubt this project will be finished by this Christmas.  Maybe next year!