Overdyed. Variegated. Hand-dyed. Whatever you call them, these lovely threads sometimes intimidate stitchers, especially when they’re used in geometric designs when the balance of color may be important.
There are two schools of thought on using multi-color threads in designs such as these. I call them the “Don’t Cares” and the “Cares.” If you’re a “Don’t Care,” you’ll let the colors fall where they may. But if you do care, this can be a challenge.
I usually fall somewhere in the middle. On My Way, just a hint of overdyed thread was used. For this, I let the colors fall where they would, but I made sure just a hint of the yellow portion of my Watercolours thread showed up in each block. This color wasn’t used anywhere else in the piece, so it added a bit of interest, but it wasn’t glaring enough to completely distract the viewer.
On some projects, though, I work more in the “Cares” camp. I’ve found that when working a symmetric geometric design, controlling the color is easiest if you can find four lengths of the multi-color threads. Then you simply stitch each of the four sides starting with the same end of the thread.
 As an example, I pulled a card of Rainbow Gallery’s Encore from my stash. To get a good run of color, I cut a fairly long length.
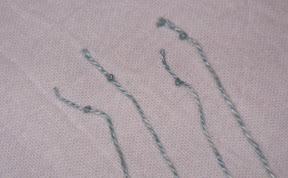
 After separating the strands, I prepared each with a waste knot, trying to keep the tails roughly the same length on each strand.
Since my stitch of choice covered the back well, I decided to start the thread “in line” with my stitching, so I could just stitch over the tail, then cut off the knot when I reached it.

By repeating this on each side, trying to keep the waste knot the same distance from the start point, you can get consistent runs of color in your stitching.

You can see that I decided to try this on Mystique. Check out the overdyed silk (in this case, Caron Waterlilies) on this block.

This can be done with any multi-color thread, but sometimes you have to hunt to find four equivalent lengths of thread. I find that’s often too much work. Why bother, when some threads are perfect for doing this because they divide easily by four:
- Bravo!, from Rainbow Gallery – 4 strands, pearl 5 weight
- Encore!, from Rainbow Gallery – 4 strands, pearl 8 weight
- Overture, from Rainbow Gallery – 4 strands, pearl 12 weight
- Waterlilies, from Caron – 12 strands, silk floss
- Silk ’N Colors, from The Thread Gatherer – 12 strands, silk floss
Can you think of others? Please share!


