/** Google Analytics script below */ /** end Google Analytics script */

Friday, July 30, 2010

Friday Finish: Jacqui's Choice

Since I'm back on a canvaswork kick, here's one of my early canvas projects.

Design: Jacqui's Choice

Designer: Nanette Costa

Technique: counted canvas

Ground fabric: 18ct mono canvas

Threads: cotton floss, metallic threads, seed and pearl beads

Stitches used: couching, beading, lots of Hilton stitches (jessicas, crescents, Amadeus)

Stitching timeframe: 2002-2003

This project was from my very first multiple-day class, taken with my local EGA chapter. Up until this, I had only taken classes through my local shop or 1 day classes at a stitching festival. Needless to say, I really enjoyed it.

I actually had it framed on point. Looking at it now, I like the diamond shape, but I’m not crazy about the rest of the framing choices, though I’m not sure what I would change if I were to have it reframed.

I’ve wondered whatever happened to Nanette Costa. She was a fabulous teacher. I’m saddened to find her listed on the “inactive or retired” list on the National Academy of Needlearts (NAN) website. Does anybody know what she’s up to now that she’s not teaching?

There are still a few of her commercial patterns in various online shops if you look hard enough.

Wednesday, July 28, 2010

Rediscovering my stitching (and blogging?) mojo

Do you ever hit a point where just about anything can distract you from stitching? I’ve been there for most of the past month.

Don’t get me wrong – I love stitching. It’s just that none of my projects has really been calling to me lately, and other silly things have distracted me in my leisure time. Yes, silly – like playing games or finding cool apps on my new iPod Touch, or surfing the web (sometimes on non-stitching sites, no less!).

It’s really pathetic that my stitching mojo just about completely stalled, considering that I’m almost done with the hardanger piece. Oh, well. It will be quick to finish when I get back to it.

I did start the sampler project that’s part of the Thistle Threads Gold Master Class, then found that since I joined the class on the last day of signups, several of my threads are backordered. On the first motif I stitched, I discovered that I’m missing two or three (out of six) colors. Not very inspiring.

Mojo returns!

All of a sudden, though, I’ve started stitching again! What changed?

It’s simple. I started my Friday Finish posts in part to inspire others, and ended up inspiring myself! My last posted finish, Silk Pageantry, reminded me how much I really enjoy canvaswork and hadn’t been doing much lately.

That’s how My Way found its way back onto my lap stand.

Finalizing decisions so I can just stitch

It’s been a while since I posted about this piece, so let me refresh your memory. I started this project in November 2008 in a class with Carolyn Mitchell.

My Way is a project similar to my more recent class, Potpourri with Margaret Bendig, in that each student chooses her own colors and threads and has a great deal of liberty about exactly how they’re placed.

Here’s what My Way looked like when I last posted about it in November. I’ve stitched on it a bit since then, so it was a bit further along when I picked it up last week.

I don’t know about you, but sometimes I want to just stitch. I don’t want to have to make decisions on every project I pick up. I think this was one of the reasons my stitching stalled. I was making decisions on Potpourri, and then on the hardanger piece.

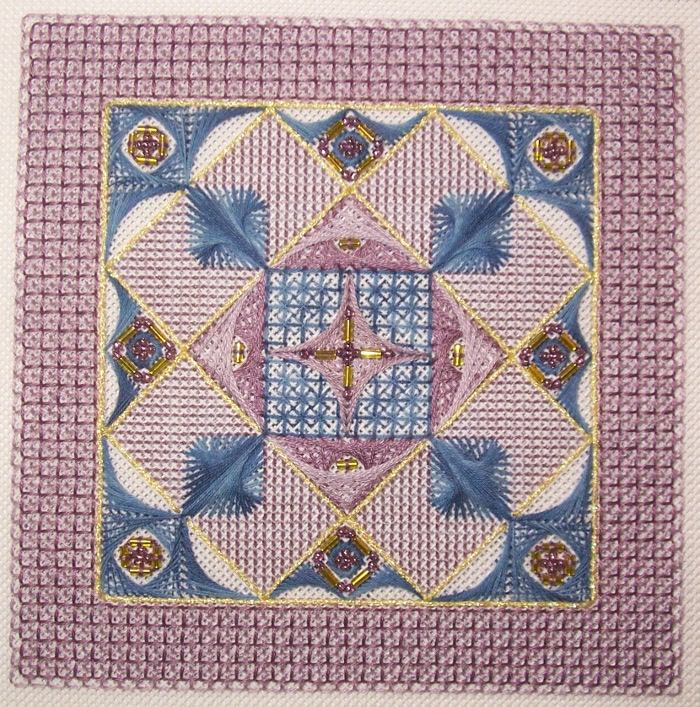
When it came to the six blocks in My Way, I’d made all of the decisions on five. I only had to finalize the center area on Block A, and then I could just stitch.

Block A is the lower middle square in the photo above. I kept pondering this block for a while, because it seemed out of place. The rest of the block centers aren’t square. They extend a bit into the “arms” of their crosses. Can you see what I mean?

I wondered what would happen if I extended the waffle stitch in the middle of this block until it hit the corner areas of the block. So pulled the center out and tried it. Aha! That’s better.

Then I wanted something different than originally designed for the “arms” of this square. So I tried a few things:

Section A is just some large eyelets in two colors. It didn’t get finished because I realized it looked too similar to the main borders of the project.

Sections B and C are actually the same stitch (alternating oblong and square crosses), in the same colors, but with the color gradations opposite each other. I took a vote with some stitching friends. Two liked B, and two liked C. Not much help there. I looked at it from across the room and decided I liked the dark in the middle.

Hooray! Now I can stitch away, with no decisions in sight until I finish all of the blocks and need to finalize a couple of things on the border.

Aaaaaahhhhh!

Oh. In case you’re curious, yes, I have finished this block. What do you think?

Sorry for the really long post. I guess I’ve been storing up blogging mojo, too. Now that I’m stitching again, there’s a chance that I’ll be posting more!

Friday, July 16, 2010

Friday Finish: Silk Pageantry

This week's pick is just because I haven't featured much canvaswork lately here on Just String.

Design: Silk Pageantry, a now-retired ANG group correspondence course

Designer: Kay Cline

Technique: silk and metal on canvas

Ground fabric: 18ct mono canvas

Threads: silk floss, metallic threads, silver pearl purl

Stitches used: crossed and flat canvaswork stitches, couching

Stitching timeframe: middle to late 2006

I changed all but the background colors from Kay Cline's original design, including switching from gold pearl purl to silver. I was surprised to notice that the silver is starting to tarnish a bit already. Does anybody have any hints for slowing this tarnishing?

You may not be able to tell from the picture, but the pearl purl (see the arrows in the picture) is actually slightly stretched from its original form, resulting in a wavy silver wire that is couched. I really like this technique.

In case you're curious about how I framed this:

Sunday, July 11, 2010

Planning a path in hardanger

When stitching filling stitches in hardanger embroidery, it’s very helpful to think through the order of stitching, or the path you’re going to take.

I’ll walk through how I stitched the second end of my pastel hardanger piece (after I learned a few things with the first!).

The first step is to cut out the appropriate threads. But wait. In case you’re unfamiliar with hardanger, take a look at the little blocks of 5 stitches. These are called kloster blocks. They act as a fabric hem so the threads next to the blocks can be cut.

The result is a mesh where, both horizontally and vertically, you’ve got four threads intact, then a space where four threads were removed.

Knowing that I’ve got to work the divided branches on to center wrapped bars (which you’ll see below), I decided to do those wrapped bars first.

Looking back at my chart for this area (option 3 in the link), you’ll see that it calls for two wrapped bars side by side down the center. In the photo above, I’ve worked from the right side to the left, wrapping one side of these side-by-side wrapped bars, and I’ve started stitching back to the right, working the second of each pair. (Does this make sense?)

After finishing the side-by-side wrapped bars, I’m back on the right (seen above), and need to start needleweaving the outside sets of threads. As I work to the left, I’m putting in the divided branches where they’re needed. In the photo below, you can see how these wrap over the wrapped bars and distort them.

In the very center, I did a different type of divided branch, where two points are anchored in fabric, and the other is over a wrapped bar. I’m sure somebody else has done this, but I don’t recall seeing it in any books.

Reaching the left side again, I’m traveling to the other bars that need weaving by slipping under the kloster blocks on the reverse side of the piece. Then I’m working back to the right.

Upon reaching the center of this path, there’s a bit of a snag. I need to stitch side-by-side wrapped bars again. Unfortunately, there’s no help for it.

I decide to stitch the lower one first, putting in the dove’s eye, then I need to somehow stitch the other wrapped bar. I did this slightly differently on each end. If I did it again, I’d repeat this method: I kept stitching the rest of the path, then went back to wrap that last bar at the end, burying the thread in the neighboring needleweaving. Anybody have a better idea?

Only a little bit left to do before the stitching is complete on this!

Friday, July 9, 2010

Friday Finish: My first Hardanger

In the spirit of the Hardanger piece I'm working on now, I present the very first Hardanger design I ever stitched.

Design: a runner made from doubling the bellpull design from Cross 'N Patch's Charity Sampler booklet

Designer: Emie Bishop

Technique: Hardanger and cross stitch

Ground fabric: 32ct evenweave (jobelan, maybe?)

Threads: pearl cotton and floss

Stitches used: cross stitch, kloster blocks, buttonhole, lacy edge, bullions, dove's eyes, spider webs, other filling stitches

Stitching timeframe: Finished in 1996. I'm guessing I worked on and off on this for a year, given that I was in college at the time.

This was my first Hardanger piece, as I mentioned above. It is a prime example of the attitude of "It's just string." Or it could have been simple ignorance. Take your pick.

  • I didn’t think it was a big deal to essentially stitch the bellpull (which consisted of two of the diamond repeats and the heart at the bottom) twice.
  • I didn't know lacy edge and bullions were supposed to be difficult.
  • I do recall vigilantly checking the alignment of my kloster blocks before cutting any threads, but I don't really remember any anxiety about cutting the threads once I knew everything lined up.

In hindsight, it’s easy to see that I should have practiced bullion knots on a doodle cloth before putting them on the real piece. In this picture, you can see the little squares made up of bullion knots on the right, where I started, and those on the left, where I finished after going all the way around the piece. There is a very distinct difference in tension!

I don’t really recall having much difficulty with the lacy edge, but to this day, I haven’t used this stitch on any other piece.

Here’s a close up of one of the ends of the design.

I should find a place to display this rather than keeping it in my cedar chest. Maybe a high shelf where little fingers can’t reach.

Wednesday, July 7, 2010

Hardanger: Option 3 Before and After

Last week I posted three options for the end area of my pastel hardanger design. The responses from readers overwhelmingly agreed that option 3 was the way to go.

So, what does option 3 look like, once it’s stitched? The photo below gives a good idea of the “before” and the “after.”

The picture of the entire piece shows how this decision works with the rest of the design.

I think all of you were right. This option really does compliment and balance the open areas near the center.

Friday, July 2, 2010

Friday Finish: Casalguidi and Lavender

Only I would propose a new series of going through past (and some current) finishes, post only two weeks on that series, and then neglect it for another two weeks. There’s no excuse, but here’s my attempt to resurrect the plan.

Here’s one that’s been done for quite a while.

Design: Casalguidi and Lavender (a retired EGA correspondence course)

Designer: Barbara Kershaw

Technique: Casalguidi (of course!)

Ground fabric: 28(?) ct linen

Threads: pearl cotton

Stitches used: Casalguidi stitch, italian four sided, detached buttonhole, needleweaving, and some neat wrapped stitch that looks like a REALLY long bullion knot (but I didn’t look up what it’s called)

Stitching timeframe: I don’t know. Finished sometime in 2006, I think.

Casalguidi is often stitched white on white or ecru on ecru, but the book Casalguidi Style Linen Embroidery by Effie Mitrofanis (now MUCH more expensive than when I purchased it) shows some antique pieces that are white or ecru on pink or light blue. These inspired me to use some pinkish linen in my stash with ecru threads.

Does the stitch used in the heavy diagonal bar in the middle of the piece look familiar? It’s the Casalguidi stitch, which I used as Santa’s walking stick on Celebration Santa.