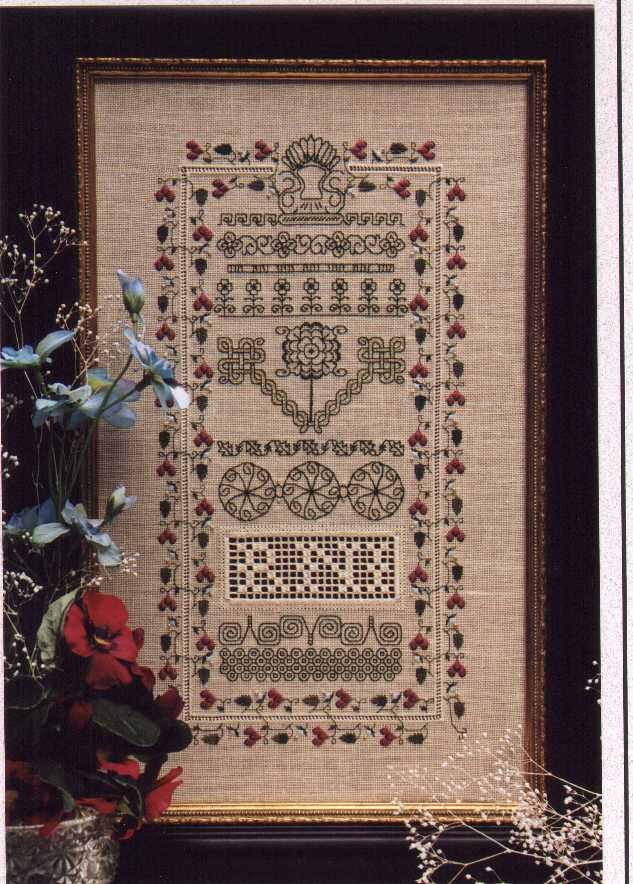
Ruskin Garden Square Progress
Just a quick progress picture tonight, folks! Enjoy!


At last. Here’s the reason why my last few posts have been a bit skimpy (as this one will be!). I’ve been plugging away at four-sided stitches on Ruskin Garden Square from Gay Ann Rogers for the better part of a week. Who knew that such a simple stitch could take up so much time? But it’s done now.
Next up on this project is to do a bunch of borders for areas that will eventually be cut out.
On a recent post about my completed Reticello 1 project, Wendy commented that she is “not completely sure what [reticello] is.” I’ll try to clear that up a bit, Wendy, as I go through the process here. From the little bit I’ve read on reticello and Ruskin lace, there are only a few differences. I’ll go over what I’ve learned about those differences as I stitch the various areas in this project.
Stay tuned!
Since I’m currently plodding away on lots of four-sided stitch on Ruskin Garden Square and don’t have much to share on that front, I hope you might be interested in one of my finished projects with a very similar type of needle lace.
Reticello 1 was designed by Diane Clements and was featured as the first of three reticello/reticella pieces in the (unfortunately now defunct) magazine The Needleworker in June/July 1999.
In this project, the edges of the center square were reinforced, then stitched all the way around with buttonhole stitch. The center square was then cut completely away. After basting the fabric to a laminated pattern, I added the horizontal, vertical, and diagonal lines, stitched over them, and then stitched the remaining shapes off of these lines. If I recall correctly, the project really wasn’t too difficult to stitch, but it took quite a while! The trickiest part was getting all of those triangles to have approximately the same tension so they came out the same size.
I did have great plans to stitch the remaining pieces in the series, as well as another project featured in the Winter 2001 Fine Lines from the same designer. It just hasn’t happened yet!
Have you tried any reticella work? How did it turn out? We’d love to see pictures!
Every year, Gay Ann Rogers holds a week-long sale of some of her patterns. Some are from her years of teaching, and this year, some were brand new. Gay Ann’s “E-Week” (as she calls it) was just a few short weeks ago. And despite the fact that I have many, many, many of her designs in my stash, I did feel the pull to purchase a couple more.
While I was combing through my stash to make sure I didn’t re-purchase something I already had, I decided that if I was going to order any more of her patterns, I should probably actually stitch some of those already in the stash.
I had two requirements for starting one:
The one I decided on fits both criteria. It’s only about 8-1/2 inches square on congress cloth, and I had the kit.
Unfortunately, I don’t know if in this case small equals faster. Because I apparently didn’t choose something easy. This project is a study in ruskin lace, in which areas of the canvas are completely removed so the stitcher can add threads back in those areas and stitch on the added threads.
Here is Gay Ann’s Ruskin Garden Square:
It’s unfortunately not a terrific photo, since it’s printed on regular copy paper and seems to be a bit washed out.
Time will tell if this doesn’t take as long as I think it might. Stay tuned!
When stitching filling stitches in hardanger embroidery, it’s very helpful to think through the order of stitching, or the path you’re going to take.
I’ll walk through how I stitched the second end of my pastel hardanger piece (after I learned a few things with the first!).
The first step is to cut out the appropriate threads. But wait. In case you’re unfamiliar with hardanger, take a look at the little blocks of 5 stitches. These are called kloster blocks. They act as a fabric hem so the threads next to the blocks can be cut.
 The result is a mesh where, both horizontally and vertically, you’ve got four threads intact, then a space where four threads were removed.
Knowing that I’ve got to work the divided branches on to center wrapped bars (which you’ll see below), I decided to do those wrapped bars first.
 Looking back at my chart for this area (option 3 in the link), you’ll see that it calls for two wrapped bars side by side down the center. In the photo above, I’ve worked from the right side to the left, wrapping one side of these side-by-side wrapped bars, and I’ve started stitching back to the right, working the second of each pair. (Does this make sense?)
 After finishing the side-by-side wrapped bars, I’m back on the right (seen above), and need to start needleweaving the outside sets of threads. As I work to the left, I’m putting in the divided branches where they’re needed. In the photo below, you can see how these wrap over the wrapped bars and distort them.
 In the very center, I did a different type of divided branch, where two points are anchored in fabric, and the other is over a wrapped bar. I’m sure somebody else has done this, but I don’t recall seeing it in any books.
Reaching the left side again, I’m traveling to the other bars that need weaving by slipping under the kloster blocks on the reverse side of the piece. Then I’m working back to the right.
 Upon reaching the center of this path, there’s a bit of a snag. I need to stitch side-by-side wrapped bars again. Unfortunately, there’s no help for it.
I decide to stitch the lower one first, putting in the dove’s eye, then I need to somehow stitch the other wrapped bar. I did this slightly differently on each end. If I did it again, I’d repeat this method: I kept stitching the rest of the path, then went back to wrap that last bar at the end, burying the thread in the neighboring needleweaving. Anybody have a better idea?
Only a little bit left to do before the stitching is complete on this!
Last week I posted three options for the end area of my pastel hardanger design. The responses from readers overwhelmingly agreed that option 3 was the way to go.
So, what does option 3 look like, once it’s stitched? The photo below gives a good idea of the “before” and the “after.”

The picture of the entire piece shows how this decision works with the rest of the design.

I think all of you were right. This option really does compliment and balance the open areas near the center.
Today's featured WIP is Jonalene Gutwein's Drawn Thread Sampler #2.

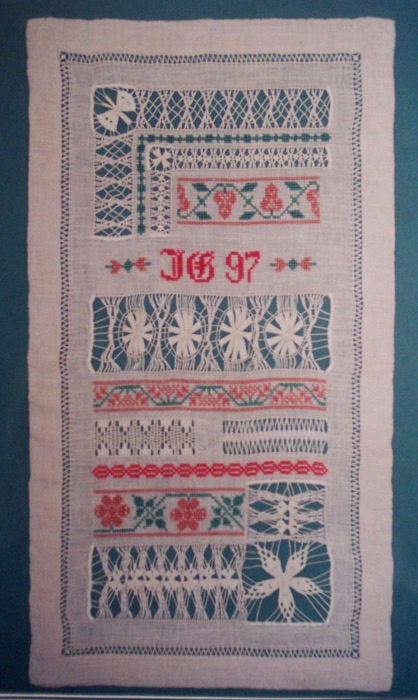 Background: This sampler is a retired correspondence course from EGA. I took the course in 2002 or 2003 with the CyberStitchers chapter. I changed the color of the cross stitched areas from the original, but I don't think I planned any other changes. The picture here is of Jonalene's original.
Yes, today's featured WIP is another band sampler. Specifically, it is the Blackwork Band Sampler by Rae Iverson of Moss Creek Designs.

Yet another sampler is today's featured WIP. It is the Heirloom Anniversary Sampler designed by Thea Dueck of The Victoria Sampler. I'm stitching this as our wedding sampler, although I could have used it as our 10th anniversary sampler this year! :-(

The peahole hemstitch (from Schwalm embroidery) is used in To the Acorn as the cutwork band in lesson 5. This blog entry was originally planned as a complete set of instructions on how to do this stitch. Here's the story of how the best laid plans sometimes go awry. I started out taking pictures of each step. It starts with the empty area.
 On the back of the piece, certain threads are cut in the middle of the band, drawn back to the edges, and woven in to the fabric for a short distance. (If you're curious, the pattern is: cut 1 thread, leave 4, cut 4, leave 4, cut 1, leave 4, cut 4, leave 4, cut 1.)
 Returning to the front, a satin stitch is worked in pearl cotton over this woven area. The ends of the woven threads are then trimmed from the back of the piece.
 A four-sided stitch is worked over the upper-most set of 4 threads.
I started the next row, in which, according to the instructions, the first 5 "legs" of the four-sided stitch are done, then two of the "bundles" are wrapped together before continuing with the four-sided stitch. I must have put that in and taken that out 4 or 5 times. The wraps kept sliding down to the bottom, and it didn't look at all like the pictures. I reread the page. I had a friend read the page. Neither of us could make it work. The text says this is a Schwalm embroidery stitch. I searched my stitch books (of which I have many, including 1 Schwalm book.) This stitch is in none of them.
In desperation, I consulted the bibliography at the end of the text. There are three Schwalm books listed, two of which are in German. I found that Threadneedle Street (a wonderful shop on the outskirts of Seattle) had all three books for a reasonable price. I ordered them on Thursday. They arrived on Saturday, much to my surprise. I'm very glad I ordered all three. The first, an English translation from a German text, had the stitch with a knot around the bundles of threads. I didn't like how it came out. The remaining two German books, both by the same author, used a slightly different version of the stitch. From the pictures (I don't read German!), it looked like a buttonhole stitch was used around the bundles. I tried it. First a buttonhole, then a second wrap, then continue with the four-sided. It worked! The wraps stayed in place!
I got so excited that the stitch was working, I forgot to take pictures. :-( As I neared the end of the band, I realized I had pulled the wraps a bit too tight. I cheated in making it work, though. I tightly laced both edges of the fabric to the scroll frame until the puckering (caused by pulling the stitch) flattened out.
Wetting the edge of a folded paper towel, I carefully dampened the band (making sure I didn't get water on the variegated silk) from both front and back of the fabric. After it dried, the linen threads had relaxed and given in to their new configuration. The puckering went away.
Despite the frustration in getting this to work, I really like this stitch. After I whittle down my stack of WIPs a bit more, I may have to do more Schwalm work. After all, I just invested in several books on the topic! Maybe I'll do something like this project that uses the peahole stitch as a dividing border.
 Last night the last wide band went in, and tonight I've finished the 4 acorns on the bottom corners and the last colored band. All that is left of To the Acorn is the cutwork sections, one between the two initials, and one in the blank area of the bottom whitework.
It's amazing what you can accomplish while listening to an evening conference call with colleagues in Japan! I was home, listening on the phone speaker, unmuting the microphone only when I needed to discuss something, and happily stitching away! That's the way to work! I found I actually could concentrate more on what was going on (rather than falling asleep or being distracted by email, etc.) while I was stitching than I usually do at work! To top it off, I finished Traditional Elegance (by Pat Taff) just as the conference call ended! Since the sides of this were laced to the scroll rods, it had been a while since I looked at the bottom row. Imagine my surprise when I discovered that I had put a "2007" date on it already! I'm glad I didn't have to change it!
The bottom rows are pretty squished from being rolled up on the scroll rods for so long. I'll have to at least dampen this and press it from the back to get the stitches back in shape before I take it in for framing.
Also on the UFO front, this week I picked up a small piece from Catherine Strickler/Indigo Rose. I started the Bead Blanket Sampler a bit over a year ago. For a time it was in my desk drawer at work, and I'd pick it up occasionally during lunchtime. When I switched jobs last year, it found its way home, and I hadn't touched it since.
Monday I finished off the front side and started work on the back - and quickly ran into a problem. There's not enough of one color of thread. I'm not a terribly frugal stitcher, but I try to be cautious when stitching from kits. Nevertheless, I ran out. I need to find enough Waterlilies 'Moss' in a similar dyelot (or another silk brand that looks very similar!) to finish the border on the back. I hate to buy an entire skein for something that would work for <100 stitches. Stay tuned!
***************************************************
WIP-loss challenge status: 4 down, 6 to go
Don't you hate it when you pull something out of the UFO pile, start to work on it, and then find out that one of the reasons it was a UFO in the first place was because it had a major screw-up in it? One that can't be fudged? Yup. I was there, last night. Here is the top portion of Traditional Elegance I by Pat Taff. This is is fairly old chart, and all I have left to do is finish up the needleweaving in the cutwork portion at the top. I figured I could plug away at this for a few days and get it done. I started working the horizontal bars, filling in doves's eyes where needed. Then it hit me. I didn't have enough room to get all the dove's eyes in before I hit the woven part of the acorns. All of the weaving was one row too low! This can be seen in the center and two right-hand acorns. Since the acorn caps are the same on top and bottom, it would have been obvious that something was wrong!
I stopped working the horizonal rows, and found I was able to unweave the vertical wrapping and the fully-woven areas with minimal damage to the thread. This is important because I'm almost out of thread. It's only Anchor perle 12, but I'm worried about dye lot. Sometimes the dye lot is worse with white and ecru threads than with darker colors. Since Anchor's not the easiest to find, I'm trying to make this ball last through the rest of this cutwork section. As a result, I'm trying to reuse the thread, as long as it's not too fuzzy.
I've been able to take out and reweave the 1-1/2 acorns on the left side so far. (See how they're one row higher?) I should be able to finish all the frogging and fixing by the weekend, and then I can start back with where I thought I was yesterday!
------------------------------------------
On a (rare) more personal note: It was two years ago today that my Dad, only age 62, was taken from us by way of an unexpected major cardiac arrest. We miss you, Dad! :-(