/** Google Analytics script below */ /** end Google Analytics script */
Showing posts with label how-to. Show all posts

Saturday, November 26, 2011

How To Start a Thread for a Line of Stem Stitch

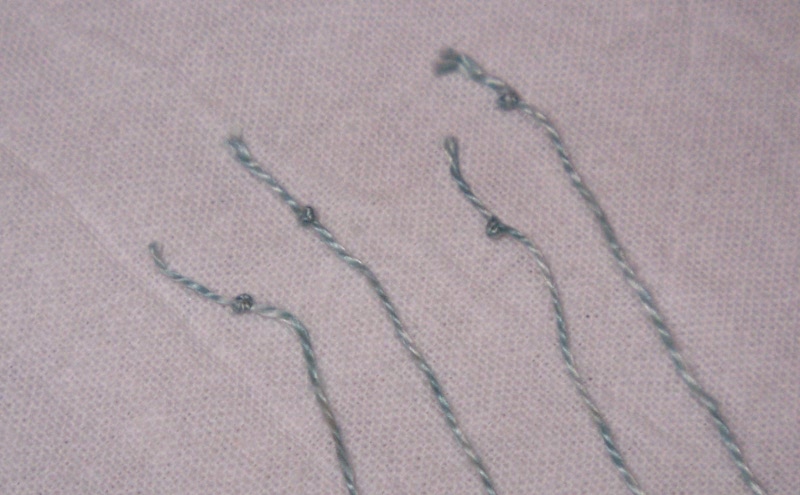
Sometimes it’s challenging to figure out exactly how to start a thread. The two most common methods I’ve seen are to use an away waste knot (to allow the stitching to be tied off later) and simply using a waste knot in the path of the stitching.

When you’re stitching a line of stem or outline stitch, you could use the away knot and then tie off the stitches later. But the “knot in the path of stitching” option needs a bit of modification to make it work successfully.

The answer? Running stitch.

As shown here, I put my waste knot in the thread and then do a few small running stitches out to where the line of stitching starts.

StartThreads1

Then you can simply stitch over these little running stitches with the stem or outline stitch, and cut off the knot when you get to it. If you can pierce a running stitch or two along the way, all the better.

StartThreads2

One of the main advantages of this technique is that it doesn’t matter if the line you’re stitching is straight or curvy. The running stitches force the thread tail to follow the curve of the line.

Does anybody else have a tip for starting threads in this situation?

Thursday, November 17, 2011

Preparing for a Ruskin Lace (or Reticello) Cutout

If you’ve ever done any Hardanger embroidery, you’re familiar with the idea that cutwork areas need to be “hemmed” with little blocks of satin stitches called kloster blocks. The preparation of a cutwork area for Ruskin lace or reticello is a bit similar, except that it is padded first and that buttonhole stitch is used as the hem.

The first step is to lay down a few long satin stitches along each side of the area that will be cut out. As in this block, there is often a row of four-sided stitches just outside of the square.

CutoutPrep1

On top of those stitches, add a round of buttonhole (or, if you’re being a stickler, closed blanket stitch), with the loop side of the stitches on the inside of the cutwork area.

CutoutPrep2

Then you can fill in the corners with a few straight stitches just to pretty it up a bit.

CutoutPrep3

That’s all there is to getting an area ready for cutting in Ruskin lace and reticello. Now, if you’ll excuse me, I’ve got another 11 little boxes to stitch!

Thursday, November 10, 2011

Stitch Study: Four-Sided Stitch

Simplicity and elegance are two words that come to mind when I think of four-sided stitch. Simple, because the stitch really only has three steps. Elegant, because of the clean lines and lacy look of this beautiful stitch.

Since four-sided stitch is often worked as a pulled-thread stitch, I like to use a needle that’s a bit larger than usually used for the thread choice. This opens up the hole in the fabric or canvas a bit more, making it a bit easier to pull.

Four-sided stitch is most easily started with a waste knot in the path of the stitch. Come up at the upper left end of where the line of four-sided stitches is planned to be. As this line develops, the tail end of the thread will be covered.4Sided_1

Step 1: Bring the needle to the back just two threads down from where you came up. Give the stitch a little tug. This tug opens up the holes of the canvas or fabric just a bit.

4Sided_2      4Sided_3

Step 2: Come back to the front of the fabric up two and to the right two threads, as seen in the photos above, to get ready for the next leg of the stitch. Give the thread another tug. Sink the needle again two threads to the left (where step 1 began). Tug once more.

4Sided_4      4Sided_5

Step 3: Bring the needle up down two threads from the start of step 2. Tug. Sink two threads to the left. Tug.

4Sided_6      4Sided_7

Then it’s time to repeat the three steps. The next "step 1” stitch starts at the point where the first step 2 did. Keep repeating, giving a slight tug after each stitch, as you stitch from left to right across your fabric or canvas.

4Sided_8

Occasionally, I find that I lose track of which leg should be the next to be stitched. There’s a very simple way to find out. Simply look at the back. When stitched in the correct order, four-sided stitch results in a row of X’s on the back of the stitching. Doing the stitches in a consistent order keeps the pull at the corners of all of the little boxes the same.

4Sided_9

When you near the end of a thread, bring the tail to the front about an inch further down the line of stitches. This is easiest to see from the back.

4Sided_10

To start a new thread, I find it’s easiest to switch to a smaller needle, perhaps even one with a sharp point. Put a waste knot in the end of the thread, and bury it in the back of the most recent stitches. Doing this keeps the pull of the thread the same, so you can’t tell from the front where the thread was changed.

4Sided_11

After bringing the thread to the front again, switch back to a larger needle and continue the line of stitching, working over the old thread tail. When you reach the point where the tail comes to the front of the fabric, give the tail a tug to make sure that last stitch is taut. Holding the tail tight, cut it very close to the surface of the fabric. If any of the tail is still sticking up, use your needle to poke it to the back.

When worked in a contrasting color to the fabric, four-sided stitch gives a neat and clean line of stitches and is a great addition to a border.

4Sided_12

Four-sided stitch is often worked as a tone-on-tone stitch, though, and that’s when the lacy feel comes out. The stitch itself becomes almost unnoticeable, and the pattern that emerges from the resulting holes becomes the highlight. This is my favorite way to use this stitch.

4Sided_13

I’d love to hear about some of the different projects in which you’ve used four-sided stitch. Please share in the comments!

Friday, July 29, 2011

A Sneaky Way to End Threads

Have you ever had difficulty figuring out just how to secure the ends of a thin, slippery thread?

That dilemma turned up I was stitching away on Magi #1. One area was covered only in long stitches in a thin metallic thread, couched every so often by more thin metallic thread. There really wasn’t much bulk on the back of the canvas to allow me to bury the thread ends and be assured that they wouldn’t work themselves loose.

I tried hiding a few backstitches underneath the couched thread to start and end threads, but those backstitches peeked out a bit and looked bulky.

For a light stitch like this, sometimes you have to forget about trying to bury the thread ends within the same area. Instead, look at what stitches will eventually be in the surrounding areas. Aha! The area right next to this one is going to be covered with a faux suede applique. Perfect!

For the Magi, I simply brought the threads over to the to-be-appliqued area, then used a simple L-stitch to start or end the thread. (Ok, truthfully, this thread was so slippery that I actually went over the L-stitch a couple of times, but that was the idea anyway.)

Here you can see where I have a few L’s (or +’s) in the empty area.


And from the back…

Of course, the area you’re ending the threads in doesn’t have to be eventually covered in an applique. It could be any heavy-coverage stitch that covers up your tiny thread ends. I could have just as easily ended the threads in the blue area on the other side, which is just long satin stitches.

One word of caution, though. Please be aware that if you’re trying to do this with a thick thread, your L-stitches are going to be bulky, and may distort whatever is placed on top of them. With a skimpy thread like this, though, the only thing that might be a concern is if the tiny stitches will peek out from under whatever will be placed over them. With a suede-like applique, I have no worries about this for my Magi!

If you try this technique, please let me know how it goes!

***************************************

Just in case you were wondering about how I was progressing with The Magi (designed by the very talented Dorothy Lesher), thus far I have only been stitching on Magi #1. Here he is so far:

I am having a lot of fun with this piece, so despite my previous comments about changing out projects more frequently, I haven’t picked up anything else in a while! But that’s how it goes sometimes…

Monday, February 21, 2011

Turning Corners on Couched Borders

My progress on Ocean Waves is continuing. The border continues with a few more rows of couching.

When stitching a couched border such as this, you may face a dilemma because the couched thread ends in a hole at the corner and then has to come up in the same hole for the next side of the border. I'm not sure how other stitchers handle this problem but I use a very simple technique to turn these corners. I don't precisely recall where I learned this trick. I think it was through a correspondence course or other class.

The best way to describe how I tackle these corners is to say I actually couch the corners in place. Instead of keeping the couching stitches on top of the fabric, I pull the couching stitches and the couched thread to the back of the canvas. As always, some of these things are easier shown using pictures.

Bring the couching thread up in the canvas hole where you want your couched thread to turn for the next side of the border.  Stitch over your couched thread, and sink your couching thread into the same hole.


Before pulling this stitch tight, leave a little slack on the couched thread on the front of the canvas, as seen here. On the back of the canvas, give a sharp tug on the couching thread. If you pull hard enough, a bit of your couched thread will actually pop through the canvas in that spot.

You may have to play with it a bit on the front of the canvas to make sure your couched thread lies smoothly, but this method can create a sharp corner without wasting a lot of the couched thread on the back of the canvas.

I'd be interested to hear if any of you have tried this technique and what you thought of it!

Oh – and here’s the finished border.

Wednesday, February 16, 2011

About threadholders…

A couple of weeks ago, Carolyn responded to a post with a wonderful question:

Can you tell me how and why flosses or threads are attached to mother-of-pearl rings or floss cards or wooden thread holders like a hornbook or heart with holes around the outside edge to keep the colors separate? I mean, are the threads wound around a stick, i.e., 18 inches long and then cut into appropriate lengths for stitching before being looped onto or into the rings and floss minders? Or are the flosses and threads purchased in such lengths from the shops? I see all of the lovely little threads and needle cases and accessories all over the net and it looks like the lengths are about 18 inches or so. I hope this is not a silly question and that your answer will benefit many others.

Before answering the question, let me elaborate on what Carolyn’s asking about. Instructions for any needlework “smalls”, such as When I am Sewing from The Drawn Thread, often include the attachment of rings for managing flosses. Similarly, threads can be managed with cards or wooden items with holes punched in them, like these thread pallettes or this hornbook.

There are only two reasons I’m aware of for using such items.

  • The first reason is purely for decoration. These are pretty! You don’t actually have to use them!
  • The second is, of course, for function. I suspect if your threadholder only has a few rings or holes, this might not be realistic, unless you’re working a project that requires only a few thread colors. On the other hand, I’ve received class kits that have included the threads attached to cardstock with holes punched in it, like the one shown here. This is much preferable to kits with loose threads that require sorting!

As for the length of threads to attach to your threadholder, it’s a combination of personal preference and ease of cutting.

  • Some threads, such as ThreadworX flosses, come pre-cut in 1 yard (?) lengths. To get to an appropriate stitching length, just cut this length in half.
  • Pearl cotton skeins (and some other threads) can be opened up into a single loop that can be cut in two places to get stitching lengths.
  • In my classes with Carolyn Mitchell, she calls the distance from the inside of your elbow to the tip of your middle finger (with your hand out flat) your “personal stitching length.” In my case, this is approximately 17 inches, so I’m usually fine with using the 18” lengths from the previous suggestions.
  • If you have a different length preference, yes, you can wrap the thread around something appropriately sized such that a single cut would result in the desired length, or find some other way to cut repeatable lengths.
  • Of course, if you’re just using the threadholder for decorative or temporary purposes, you can just attach a full skein (as seen in one of the links above).

Physically attaching the thread is fairly straightforward. Simply use a half-hitch knot. Fold the thread length in half, insert the folded end through the ring, put the cut ends through the loop formed by the folded end, and pull tight.

Carolyn, I hope this answers your question. If anyone has anything to add, please do so!

Friday, November 19, 2010

Stitch Study: Waffle Stitch (or Norwich Stitch) Tutorial

Yes, after an almost-two-year hiatus, I’m actually writing a stitch study post again. This is my first stitch study on a canvaswork stitch, the waffle stitch.

A bit about naming

Before getting into the details about the stitch, it helps to discuss the naming of this stitch. Like many stitches, this one comes up in stitch books under multiple names. In this case, it can be either the waffle stitch or the Norwich stitch.

The reverse is also true, though. The name “waffle stitch” is also another name for the broad cross stitch, and there are waffle stitches in both knitting and crochet.

Don’t be intimidated…

When first encountering the waffle stitch, it’s easy to be overwhelmed.  Depending on the type of stitch diagram and the size of the waffle stitch, the numbering on the diagram can quickly reach double digits. By breaking the stitch down and explaining the pattern, though, I’m hoping you’ll find it more approachable and perhaps even relaxing to stitch.

Let’s get started!

Step 1. Start with a simple cross stitch over multiple canvas threads. Some books will tell you that you have to have an odd number of threads, but that’s not actually true. To demonstrate, my example is over 12 threads of canvas.

The next stitch starts a repetitive pattern.  To provide a bit of contrast and because it looks more interesting, I switched to a different color.

Step 2. Come up in the hole just below the top left corner of the base cross stitch. This stitch is going to run alongside the upper-left to lower-right (\) portion of your cross stitch. Sink the needle one hole to the left of the bottom right corner.


Step 3. Your thread on the back is going to travel across the bottom of the stitch. Come up one hole to the right of the bottom left corner of the cross stitch. Now we’re going to parallel the other half of the cross stitch (/), so you’ll sink the needle below the top right corner of the cross.


Step 4. Come up one hole above the bottom right corner of the cross. (You’ll notice that your thread on the back runs down the right side of the stitch.) This stitch ends one hole to the right of the top left corner of the cross.


Step 5. Can you guess? Your thread, on the back, will go across the top of the stitch, so you can come up one thread to the left of the top right corner. And you’ll sink it one thread above the bottom left corner.

There! That’s one round, or one repeat, of the stitch.

Step 6. Repeat steps 2-5, moving one hole closer to the center of each side with each round. So the second round will start by traveling (on the back) up the left side, and coming up one thread below the previous round.

You can tell if you’re repeating the pattern correctly if all of your stitches on the back are on the edges of the square, as seen here.


With another round complete, you’ll have something that looks like this:

Keep going, repeating steps 2 through 5, changing colors as desired.

Here’s why some folks say you have to start with an odd number of threads. I’d like to add one more round of stitches, but if you look closely at the picture above, you’ll see I only have one open hole on each side. I can’t stitch another round like the previous rounds.

So I have to cheat. This round just isn’t going to have stitches on the back along the edges of the square. Oh well. Who’s going to know?

Step 7. Here’s how I like to stitch the last round on an even waffle stitch. I use double running stitch!

A. Same as step 2 above.    

B.      C.

D.

Yes, the back isn’t quite as orderly…

                                                                            …but who cares?

So what about odd waffles?

When you do have an odd number of threads in your waffle, you can just stitch the normal rounds right up to the end. Here’s the beginning of the last round of the waffle if it’s stitched over 13 threads.

A side-by-side comparison

Front:                                           Back:


About ending threads

You may be wondering why I left all of the thread ends off to the side. In this case, it was for demonstration purposes. When I’m using waffles in a project, I’ll sometimes bury the ends in surrounding stitches. Usually, though, I’ll use L stitches to start and end threads in the middle of the waffle, since they’ll be covered over anyway.

Now it’s your turn

Are you ready to tackle waffle stitches? Try them out and let me know how it goes! What are your favorite threads to use? (By the way, ribbons, like Kreinik’s 1/16” metallic ribbon or Rainbow Gallery’s Neon Rays, work wonderfully.) What color combinations do you like? What’s the biggest waffle you’ve tried?

Please share! (And let me know if anything isn’t clear above!)

Monday, October 18, 2010

An Easy Way to Control Color With Multi-Color Threads

Overdyed. Variegated. Hand-dyed. Whatever you call them, these lovely threads sometimes intimidate stitchers, especially when they’re used in geometric designs when the balance of color may be important.

There are two schools of thought on using multi-color threads in designs such as these. I call them the “Don’t Cares” and the “Cares.” If you’re a “Don’t Care,” you’ll let the colors fall where they may. But if you do care, this can be a challenge.

I usually fall somewhere in the middle. On My Way, just a hint of overdyed thread was used. For this, I let the colors fall where they would, but I made sure just a hint of the yellow portion of my Watercolours thread showed up in each block. This color wasn’t used anywhere else in the piece, so it added a bit of interest, but it wasn’t glaring enough to completely distract the viewer.

On some projects, though, I work more in the “Cares” camp. I’ve found that when working a symmetric geometric design, controlling the color is easiest if you can find four lengths of the multi-color threads. Then you simply stitch each of the four sides starting with the same end of the thread.

As an example, I pulled a card of Rainbow Gallery’s Encore from my stash. To get a good run of color, I cut a fairly long length.


After separating the strands, I prepared each with a waste knot, trying to keep the tails roughly the same length on each strand.


Since my stitch of choice covered the back well, I decided to start the thread “in line” with my stitching, so I could just stitch over the tail, then cut off the knot when I reached it.

By repeating this on each side, trying to keep the waste knot the same distance from the start point, you can get consistent runs of color in your stitching.

You can see that I decided to try this on Mystique. Check out the overdyed silk (in this case, Caron Waterlilies) on this block.

This can be done with any multi-color thread, but sometimes you have to hunt to find four equivalent lengths of thread. I find that’s often too much work. Why bother, when some threads are perfect for doing this because they divide easily by four:

  • Bravo!, from Rainbow Gallery – 4 strands, pearl 5 weight
  • Encore!, from Rainbow Gallery – 4 strands, pearl 8 weight
  • Overture, from Rainbow Gallery – 4 strands, pearl 12 weight 
  • Waterlilies, from Caron – 12 strands, silk floss
  • Silk ’N Colors, from The Thread Gatherer – 12 strands, silk floss

Can you think of others? Please share!

Sunday, October 5, 2008

How-to: spaced Ceylon stitch

One of the main stitches I'm using on the Tudor-Style Purse is a spaced Ceylon stitch. Basic single Ceylon stitch looks like a chain stitch but with the threads crossed at the pointed end of each stitch instead of being in the same hole. It is worked the opposite way of a chain stitch, too, with each stitch looping under the previous stitch.

The spaced version (my terminology) of Ceylon stitch is done with two of these loops spaced some distance apart. You can start with two straight stitches separated by a gap and loop the first Ceylon stitches through these. (My apologies for not getting a photo of this!)

Each subsequent stitch is worked into the previous stitches. If you're working the stitch toward yourself, bring the needle through the fabric on the left side, a little bit away from the previous stitch. Insert the needle under both legs of the left loop of the preceding stitch, and pull the thread through.

Repeat this on the right side loop of the previous stitch, and pull the thread toward yourself. The tension is a bit tricky. You don't want sloppy loops, but you also don't want the loops pulled so tightly that you won't be able to work the next stitch. Sink the needle into the fabric on the right side, and come up again on the left for the next stitch.

The Plimoth Plantation is using this stitch on their 17th century embroidered jacket. For more details on the stitch, they have a much more detailed tutorial (in PDF format) written by Tricia Wilson Nguyen. I'm guessing it is easier in the silk thread used there than in the metallic I'm using!

Edited to add: Megan a.k.a. Elmsley Rose, who's working an Elizabethan sampler (and just mentioned Ceylon stitch in her post yesterday - though I didn't know it until just now!) asked about the difference between Ceylon stitch and ladder stitch. Since ladder stitch was unfamiliar to me, I looked it up. I found that Mary Corbet has a great video on ladder stitch. It looks the same as this spaced Ceylon stitch, with a couple of minor exceptions: it starts out differently, and the stitches on the back are straight across, whereas mine slant slightly down to the next stitch. I try to make the start and end of each stitch straight across on the front. The difference in this case is likely only the preference of the stitcher.

The other difference is the name "Ceylon stitch" actually encompasses more than just this spaced version. As I mentioned above, it can look like a single chain stitch, or several can be done next to each other. The latter is a bit like detached buttonhole but worked into the stitches of the previous row rather than between the stitches of that row. Thanks for asking!