/** Google Analytics script below */ /** end Google Analytics script */

Tuesday, October 26, 2010

Mystique, Lesson 3 Completed

I’m still having a lot of fun working through Carolyn Mitchell’s Mystique in the order she used when it was taught as a mystery project. Here’s how it stands now that lesson 3 is done.

This lesson consisted primarily of lots of smyrnas (in the four large outer blocks) and basketweave (in the outer rectangles and inside the smyrna circles). The only other areas included in this lesson were the borders of the East and West blocks, which were filled in.

This project really is fascinating. The finished piece, at first glance, appears to have identical North, South, East, and West blocks. In reality, though, they’re all unique. In this lesson, you can see the differences start to emerge. At this point, the sides opposite each other still match.

Stay tuned…

Monday, October 18, 2010

An Easy Way to Control Color With Multi-Color Threads

Overdyed. Variegated. Hand-dyed. Whatever you call them, these lovely threads sometimes intimidate stitchers, especially when they’re used in geometric designs when the balance of color may be important.

There are two schools of thought on using multi-color threads in designs such as these. I call them the “Don’t Cares” and the “Cares.” If you’re a “Don’t Care,” you’ll let the colors fall where they may. But if you do care, this can be a challenge.

I usually fall somewhere in the middle. On My Way, just a hint of overdyed thread was used. For this, I let the colors fall where they would, but I made sure just a hint of the yellow portion of my Watercolours thread showed up in each block. This color wasn’t used anywhere else in the piece, so it added a bit of interest, but it wasn’t glaring enough to completely distract the viewer.

On some projects, though, I work more in the “Cares” camp. I’ve found that when working a symmetric geometric design, controlling the color is easiest if you can find four lengths of the multi-color threads. Then you simply stitch each of the four sides starting with the same end of the thread.

As an example, I pulled a card of Rainbow Gallery’s Encore from my stash. To get a good run of color, I cut a fairly long length.


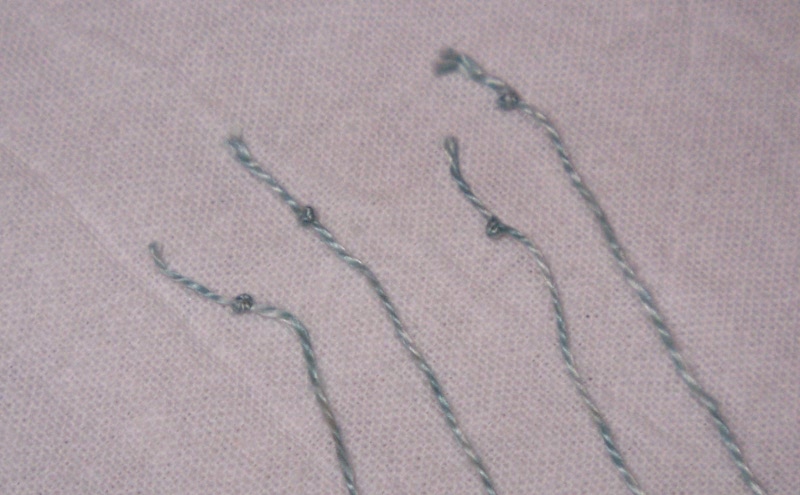
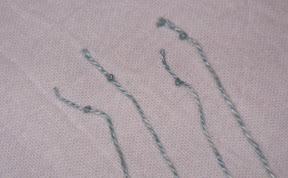
After separating the strands, I prepared each with a waste knot, trying to keep the tails roughly the same length on each strand.


Since my stitch of choice covered the back well, I decided to start the thread “in line” with my stitching, so I could just stitch over the tail, then cut off the knot when I reached it.

By repeating this on each side, trying to keep the waste knot the same distance from the start point, you can get consistent runs of color in your stitching.

You can see that I decided to try this on Mystique. Check out the overdyed silk (in this case, Caron Waterlilies) on this block.

This can be done with any multi-color thread, but sometimes you have to hunt to find four equivalent lengths of thread. I find that’s often too much work. Why bother, when some threads are perfect for doing this because they divide easily by four:

  • Bravo!, from Rainbow Gallery – 4 strands, pearl 5 weight
  • Encore!, from Rainbow Gallery – 4 strands, pearl 8 weight
  • Overture, from Rainbow Gallery – 4 strands, pearl 12 weight 
  • Waterlilies, from Caron – 12 strands, silk floss
  • Silk ’N Colors, from The Thread Gatherer – 12 strands, silk floss

Can you think of others? Please share!

Tuesday, October 12, 2010

Mystique: Lesson 2 complete

When Carolyn Mitchell originally taught Mystique to stitchers in her local area, it was a mystery project. As a result, the instructions are broken up into several lessons.

The first lesson consisted of all of the borders, and we completed this as prework for the class.

Since the class, I’ve completed lesson 2.

This lesson included the long rectangles around the center (with a few blank spaces for future beadwork), the gold X’s in the corners of the large North, South, East, and West boxes, outlining the border regions of those same boxes, and filling this region in North and South.

As you can see, because this was a mystery sampler, the lessons skip around the project quite a bit. A few of my classmates have been trying to finish the North block, and have found that they have to diligently read through lots of instructions to locate all of the details of this block.

I decided I didn’t want to work that hard on this piece and would rather be stitching instead of hunting for “What stitch goes here?”. My stitching time is too limited right now to spend it that way, so I’m going with Carolyn’s recommendation that we just work through the project in the order listed in the instructions.

I’m curious. How would you do it? Would it drive you nuts to leave a block almost complete like the North block on my piece?

Friday, September 24, 2010

Mystique class with Carolyn Mitchell

Yesterday and today I had the privilege of taking another class with Carolyn Mitchell. As in my previous class with her, I found her teaching style quite enjoyable.

She was thorough in explaining the placement of easier stitches, and in specifying which threads were needed for each stitch being reviewed in class. This wasn’t completely an easy feat, since there were two completely different color schemes available to participants. For more challenging stitches, she demonstrated each stitch several times in small groups.

After discussing or watching a demonstration of a given stitch, we had plenty of time to try it out and ask questions, which she patiently answered (some multiple times!). In fact, I think I finished more in the past two days than I’ve ever managed to do in a class.

Carolyn’s method of designing, she explained, is to stitch first, and then write instructions and chart the project. When she first started designing, she’d try drawing up the chart first, and then stitching, but she ended up making changes while stitching, which resulted in recharting the design.

Due to the lag between actually stitching an area and writing the instructions, we did have a few differences between the original and the eventual written master thread list and descriptions of which threads were to be used in a given area. Because of this and changes in dye lots, it was necessary to make a few changes to the instructions. Fortunately, these were fairly few and far between, and were all corrected at the beginning of class.

All in all, another wonderful class, and I look forward to making more progress on this project!

Wednesday, September 22, 2010

Looking ahead

Having finished My Way last week, I now have no fewer than THREE large canvas projects on my near-term radar.

The first, of course, is Mystique, the project from my Carolyn Mitchell class over the next two days. We did have to stitch the borders for the project as pre-work for the class, but fortunately the most time consuming part of this was the counting. The stitch is a simple slanted gobelin stitch over two canvas intersections.

Unlike My Way, Carolyn strongly suggested that all students use one of her two color combinations, so there’s no chance for my progress to stall simply due to decision paralysis. I’m looking forward to this!

Also on the horizon is Jim Wurth’s Prelude to Peace, an online class through Shining Needle Society. This class is scheduled to start October 1st. I’ve chosen my colors – just slightly brighter versions of the original blues and browns, but haven’t actually purchased any of my threads yet. I guess I’d better get going on this! (Note, the picture in the link above is another stitcher’s, not Jim’s original. I couldn’t find a picture online of the original colors, except in the SNS Home Room. If you’re really curious, you can always join – it’s free!)

Finally, my local EGA chapter is doing the correspondence course Cleopatra’s Cat by Mary Long. Since I’m not a cat person, I’m taking some liberties with this project. I’m making a greyhound outline from a picture of my Sophie, and will be stitching it in shades of brown and black to match her brindle coloring.

I’ll try to post a bit more frequently to share how I’m approaching this. Yes, it means a lot of decisions, but since it’s mostly thread decisions rather than color decisions, it shouldn’t be too difficult, yet will still present an interesting challenge.

In the meantime, I’ve actually picked up one of my slow WIPs. Over the past week, I’ve made a bit of progress on the border of Rae Iverson’s Blackwork Band Sampler.

If I don’t actually finish a few things, I’m never going to meet my goal of ending the year with fewer WIPs than last year. But then again, I’m sure that’s not the only yearly goal that won’t be met! :-)

Friday, September 17, 2010

Friday Finish: My Way

Yes, it’s finally done!

Design: My Way

Designer: Carolyn Mitchell

Technique: counted canvas

Ground fabric: 18ct mono canvas

Threads: LOTS!

Stitches used: LOTS!

Stitching timeframe: Started borders October 16, 2008; class November 8-9, 2008; finished September 14, 2010

For more detail around the threads and stitches used in this project, see my previous posts about it. And no, I have no idea what I'm going to do with it. It won't really "go" with anything in my house, but I had fun stitching it and though the decisions frustrated me from time to time, I think I learned a lot from this challenging piece!

I finished just in time. My next class with Carolyn Mitchell (her gorgeous Mystique) starts next Thursday!