/** Google Analytics script below */ /** end Google Analytics script */
Showing posts with label HP canvas. Show all posts

Wednesday, May 5, 2010

Making Santa's Tree Look Realistic

Over a year ago, I started to stitch the tree that Santa is carrying. I found that if I stitched it in random long-and-short stitches using the thread that came in the kit (Thread Gatherer's Sheep's Silk in Forest of Greens). I quickly found that this stitch choice (as I stitched it) ended up looking like a big blob of nothing. Certainly not a tree. Unfortunately, the original photo shows a decorated tree, with too much bling to let me tell how the green was stitched.

Even worse, I found that I had a lot of the canvas peeking through from between my stitches. Since the canvas green was quite a bit different than the green of my thread, this was quite obvious.

Thankfully, Jane (hand-painted canvas guru extraordinaire) from Chilly Hollow made a great suggestion. She advised stitching the entire tree with either tent or encroaching gobelin to cover the canvas before adding the random look of the tree's needles. So I did that. Used encroaching gobelin with floss to cover the whole thing. And the tree's been in that state since January of 2009.

I wanted to wait to finish the tree until the background was complete, thinking that some of the tree's needles could overlap the background stitching a bit. As I mentioned several weeks ago, the background is finally finished. Now there's no excuse not to tackle the rest of the tree.

Back to the long and short. I tried again to use the thread in the kit. I started at the bottom of the tree. I got this far:


It just wasn't working for me. The thread was too thick, parts of it were far too blue, and it just didn't look like evergreen needles to me.

So I went back to the drawing board. What thread would look like pine needles? I didn't want to use a stranded thread like floss - a single strand would be too thin, and laying multiple strands wouldn't look like needles. Maybe a round thread? Well, something like pearl cotton would be too... um... structured. You know. Unnatural. I needed a thread without a tight obvious twist.

The winner was a thin wool thread from The Gentle Art called Simply Wool. I didn't use long and short stitches. Instead, I just kinda sketched in branches with needles using the thread.

It looks somewhat strange in the photo because the needles on the lower half of the branches are slanted in the same direction as the encroaching gobelin. This makes them less noticeable than the upper needles that are slanted opposite to the gobelin stitches. It's not quite as obvious when looking at the actual stitching, but it is there. I don't know how to fix it, but I don't think I really need to.

I may go back with a lighter green shade of wool to add some dying needles, but maybe not. The variations in the gobelin may provide enough depth.

What do you think?

Monday, May 3, 2010

Using Casalguidi Stitch for Santa's Walking Stick

Over the past few weeks, I've made a bit more progress on Celebration Santa (canvas and stitch guide from Joan Thomasson).

When I started this project, I wasn't sure how I was going to stitch his walking stick. In Joan's original, she stitched over the brown for the stick and attached a real twig, then stitched Santa's fingers over it. This wasn't a look I was going for. Besides, it just seemed so... um... dirty to attach a twig to my canvas. Never mind I have no idea how that would hold up over time. I'm not stitching this to be an heirloom, but I would like it to last for several years, at least!

Instead, I opted to use the Casalguidi stitch, which is sometimes referred to as raised stem stitch. As the name implies, this stitch is traditionally used in Casalguidi embroidery from a little town in Italy called--you guessed it--Casalguidi! Unfortunately, I neglected to take specific step-by-step pictures, but this site shows the progression of the stitch.

For Santa's stick, I used brown DMC floss for the padding and base stitches, then switched to a variegated 6-strand floss for the stem stitches. I chose to use all six strands, not separating the threads before stitching. This is supposed to look like a stick, after all, and it shouldn't be completely smooth.

I was pleasantly surprised at the result.

This is a prime example of why I try all sorts of stitching techniques. I actually learned Casalguidi stitch in an EGA correspondence course for the traditional technique, and was thrilled to find an additional use for it!

How about you? Have you found new ways to use old techniques?

Thursday, March 25, 2010

Santa's gold trim

On to Santa's details!

I started with the gold trim at the top and bottom of the navy area on his clothing (skirt? robe? tunic? what is this?). This is simply a heavy gold braid, perhaps a size 16, couched with a smaller metallic gold thread. In this case, the couching thread is the now-obsolete DMC Fil Or, but a size 4 braid or metallic floss would have worked.

The same threads were also used for couching the swirly design on the lower portion of Santa's red robe. I deliberately simplified the path of the right side of this line of couching since something else was going to go over it.

According to Santa's stitch guide, he was supposed to get a spider web rose in gold in that far right area. I tried this, but it didn't stick around. It looked like a big gold blob - not at all like the nice flower shown in Joan's original.

Instead, I kept the "spokes" of that web and turned them into fake bullion knots. I simply wrapped each of the spokes with the thicker gold thread, careful not to catch the red threads underneath everything. Then I added lazy daisies in between each of these spokes.

Unfortunately, since I no longer had a solid flower there, the original swirly line showed through the now-airy flower. It looked strange. I very carefully cut the couched thread in the middle of the flower. I pulled the thread out from under the flower and brought the ends to the back of the canvas on either side of the flower. Fortunately, there were only a few couching stitches used in this area. I was able to pull a few to the back, but a couple are still lurking underneath the flower. They're not visible, and that's all that matters.
From the photo, it's somewhat hard to tell, but this detail does add a bit of dimension. Perhaps a semi-side view would help...
Adding little details like these to pictorial projects (as opposed to geometrics or samplers, for example) is really simple and can have a lot of impact. In this case, some of the details were called out in the stitch guide, but this experience is an example of how easy it is to add some zing with a bit of embellishment.

Monday, March 22, 2010

Oriental stitch background

As of last week, my hand has recovered sufficiently from carpal tunnel surgery to allow me to pick up some canvas work. My attention was caught by Joan Thomasson's Celebration Santa. Over the course of three or four days, I was able to FINALLY finish Santa's background.

The background is stitched in Oriental stitch using four strands of Needle Necessities floss. When I began the background (months ago), my first impression was that this stitch seemed quite large for the background. In fact, I still think it's a bit large, but I think it will be fine once Santa is finished into a stand-up figure. The curved surface of the figure, especially at the edges, will, I hope, help Santa stand out and the background recede a bit. What do you think?

Santa still needs quite a bit more work, but most of it is fun touches. Stay tuned for the details!

Wednesday, December 30, 2009

First Christmas Ornaments

MIL's:


Beautifully stitched and finished, hanging on our tree.

Mine:

That's right. Not even up on stretcher bars yet. I didn't even order it until the week of Thanksgiving. What kind of mom am I?

Never mind that it's not even going to be the next one I start. That honor is for my EGA master craftsman piece that's due the end of March. (Didn't I say recently that I try not to stitch for deadlines? So much for that idea.)

Hopefully I can get the first Christmas ornament done before next Christmas!

***************************************
A long-overdue Erin update: When we first learned of the difficulty with Erin's hips, I had hoped she'd be crawling by Christmas. And she was - backwards. For almost a month, she'd get up on hands and knees, look at something she wanted, and move away from it! Finally, on Christmas, she figured out how to move forward!

I'd like to ask a favor. Our local newspaper has a "Meet the Babies" section every year. The cutest baby (partially determined by online votes) wins a prize! If you're so inclined, please vote for Erin. Her picture (a cropped version of the photo below) should be up tomorrow (12/31). I'll update this post with a direct link once it's available.

It's up! You can vote here.


You can vote via your facebook account (if you have one) or by entering your email address. I've been assured by the newspaper that the email addresses are not being saved for any other use than to keep only one vote for each address for any given child. (You can vote for up to nine babies, but unfortunately you can't use all nine votes for one baby!)

Thanks! And if I don't post tomorrow, Happy New Year!

Wednesday, December 2, 2009

Happy Dance (and stitch guide): Green Ornament


Cross one off of the WIP list. This Kathy Schenkel ornament is done! Here's a stitch guide, if anybody's interested.

Green Areas:
Start with the rows of Bargello stitches. (If you're not familiar with Bargello, Wikipedia surprisingly has a decent overview.) For this ornament, the Bargello is completed with vertical stitches over 4 threads. Begin the bottom Bargello pattern where the lower green area meets the white central band, and just follow the pattern established by the painting. Use of a laying tool is recommended!
  • The first (inner-most) row is Kreinik 1/16" ribbon in color 009.
  • Below this is a row of Felicity's Garden #016, Evergreen, using two strands.
  • The third row is Vineyard Silk Classic #C-146, Cactus, using two strands.
  • Repeat this pattern for the subsequent rows.
  • When it's time to use the Kreinik ribbon for the third time, lengthen the stitches to cover the bottom of the ornament.
When the lower green section is done, turn the ornament 180 degrees and stitch the top the same way. End with the second row of Felicity's Garden. There's a tiny row of green unstitched, but that actually helps with working the gold top of the ornament.

Gold Ornament Top:
Using Kreinik #8 braid in color 002, fill this area with woven stitch. Work the stitch right over that first row of green intersections. This makes it look a bit like there are holes in the bottom of the ornament top, and the color of the ornament is showing through.

Note: This area is really hard to photograph, due to the gold metallic on top of gold metallic paint, but refer to the enhanced photograph at right to see the detail a bit better.

Central White band:
Using Rainbow Gallery's Patina #PA10 (one strand, right as it comes off the card), work this area in basketweave. Change the direction of the tent stitches in the diagonal areas between the petals of the poinsettias, so the stitches are angled away from the center.

Green lozenges:
Satin stitch the green lozenge-shaped areas with Kreinik 1/16" ribbon #009.

Poinsettias:
Each petal of the poinsettias is stitched in four parallel diagonal stitches over four intersections, using Rainbow Gallery's Petite Frosty Rays #PY072. A black seed bead is used over each of the four black intersections at the center of each flower.

Enjoy!

(Oh, and thanks to all who commented on the previous post. I'll be responding to some of the comments in tomorrow's post.)

Saturday, November 14, 2009

WIP: Green Ornament (from Kathy Schenkel)

I think I actually have fewer stitches in today's WIP than yesterday's, but I've got more of the piece completed.  This is a rare small project for me.  Today's featured WIP is a handpainted canvas ornament from Kathy Schenkel.


Technique/Materials:  Various (mostly yet undetermined) stitches on handpainted 18ct mono canvas. I've pulled a bunch of appropriate threads from my stash. So far, I'm using Felicity's Garden (a thread I've never used before, only have one skein of, and it happens to be a perfect dark green), Vineyard Silk, and Kreinik 1/16" ribbon.

Background:  I picked this canvas up last year when my LNS hosted a Kathy Schenkel trunk show. When contemplating what stitches to use, the scalloped area just cried out to be stitched in Bargello, so that's where I started! I'm not sure what I'm doing for the rest yet.

Why it's not done:  This is another "desk" project, and I don't often pull it out at lunch. If I do, it only gets about ten minutes of attention. Never mind this sat in my desk for four months while I was out on bedrest/maternity leave last winter.

What's left to do:  The rest of the Bargello, the center band, and the gold ornament top. Now that I've brought it home to photograph it, I may just spend a couple of evenings finishing it.

****************************
A long-overdue Erin update:  On Halloween, I posted pictures of Erin in her jack o'lantern costume, but I neglected to mention that she decided to try to complete the outfit by cutting her first tooth that day. Now, that tooth is becoming visible in pictures.

Her new favorite pastime is pulling off her socks.

But like mommy, she can sometimes be distracted by fabric textures.

Wednesday, November 11, 2009

WIP: Fans & Tassels Kimono (by Sophia Designs)

Continuing the Japanese theme from yesterday, today's featured WIP is the Fans and Tassels Kimono, a handpainted canvas from Sophia Designs. At least, that was the name I found on one website. I usually just think of it as "the red kimono".


Technique/Materials:  The kimono is a handpainted design on 18ct mono canvas.  It is stitched primarily in silks and metallics, including Japan gold threads, with some beaded touches.

Background:  This piece was started in August 2005 during a canvas enhancement class with Brenda Hart, who was brought into town by my local ANG chapter. Brenda helped me with a stitch guide for most of the major sections of the canvas, and I love how it's come out so far. (I've posted before about this piece. Check out the first four results from that link.)

Of course, I always have to make things more complicated than they need to be. Since kimonos are typically shown with motifs in Traditional Japanese Embroidery, and that style often has couched areas of Japan gold threads, I decided that the tassels and the gold outlines of this design should be couched Japanese gold. I'm going all the way - right down to stitching the gold in pairs and using the traditional koma (spools) to hold the thread while stitching.

Why it's not done:  That's a lot of couching, which can sometimes make my carpal tunnel syndrome flare up. (Wow. It seems like this is a common theme. Maybe I should actually suck it up and get this fixed!)

What's left to do:  The couching, which I estimate will take at least 30 hours. But it will be stunning when it's done, if I say so myself.

Wednesday, November 4, 2009

WIP: Celebration Santa (by Joan Thomasson)

Today, I'm featuring a hand-painted canvas WIP, Joan Thomasson's Celebration Santa.


Technique/Materials:  Various canvaswork stitches on hand-painted 18ct mono canvas using some charms and a variety of threads:  DMC floss and Medici wool, Kreinik braids, Needle Necessities and ThreadworX overdyed floss, Thread Gatherer's Shepherd's Silk, Silk 'n Ribbon, and Poodle Cuts, and strips of ultrasuede. I'm primarily following the stitch guide that came with the kitted project, though I am making a few minor changes in both stitches and threads.

Background:  At our EGA chapter's holiday dinner in early December 2008, I won the "opportunity basket." This kit was one of the items in the basket. When I ended up on bedrest for my pregnancy later that same week, I decided I needed to start something new. Since I wasn't able to get into the Christmas spirit by decorating my home, I chose this project as my new start. I made good progress in the following three weeks, until I ended up on bedrest in the hospital. Late in January (still in the hospital), my DH brought this project to me, but advancing pregnancy and almost 5 weeks of solid stitching were causing my carpal tunnel to flare up, and I wasn't able to stitch on it much.

Why it's not done:  Within a week of DH bringing this project into the hospital, we found another full-time diversion: a 4lb, 2oz, five-weeks-premature baby. Enough said!

What's left to do:  Finishing the background, stitching a second layer on the tree for a "real" look, couching Poodle Cuts for Santa's beard, adding turkey work for the fur (can you believe I've never done turkey work?), putting finishing touches on his coat, robe, and boots, and stitching his staff. Regarding the staff:  the stitch guide says to find a twig and attach it, or to stitch the staff in long-and-short stitches.  I don't want to use a twig, but I want the dimension, so I'm going to use Casalguidi stitch (also known as padded stem stitch) in a brown overdyed floss.

I somehow doubt this project will be finished by this Christmas.  Maybe next year!

Wednesday, January 28, 2009

Very slow progress

Well, it finally happened. No, not that! After over a month of many hours of stitching each day, my carpal tunnel and/or the pinched nerve in my neck has flared up, so I've had to resort to actually reading the book I brought to the hospital. My right hand bothers me if I do much else, even writing the thank you notes I need to write! I'm surprised to find that typing does not seem to be bothering me much, though!

Before it became apparent that my hands were getting much worse, I was able to work on a bit more of the background of Celebration Santa. I also stitched a base layer of encroaching gobelin on Santa's tree. Thanks to Jane for suggesting I do this before stitching an upper layer of longer stitches with random long stitches to simulate the tree's needles! Now I don't need to worry about having these long stitches cover all of the canvas. I will be finishing the background around the tree before adding this second layer, so the tree needles may extend a bit over the background stitches.

*********************************
Pregnancy ticker: 34 weeks, 5 days.
I've been taking longer and longer walks around the hospital over the past few days, trying to build up my stamina. If this also triggers a few contractions, all the better, so we can minimize the medications that will be needed when they induce labor on Friday.

Stay tuned! The next post will likely be submitted by DH this weekend with news of BJ!

Saturday, December 20, 2008

Lots of Santa Progress

Given that I can't do much besides sit or sleep, Celebration Santa has seen a lot of progress. Since the last post about this piece, I've stitched several large areas, including all of his clothing (save the hat and footwear) and his pack. I love the fact that the strap for the pack is an actual strap made of ultrasuede (I think).

As you can see, I've also begun the background. I wasn't sure about using the Oriental stitch for the background, because it seems so heavy. I will be having this finished as a stand-up, though, and think that once the sides are curved around the stuffing, Santa won't be overwhelmed with the background. If I were to finish this as a framed piece, I'd have to reconsider. I did reduce the number of floss strands from 5 to 4, though. I find that 4 strands covers very well with diagonal stitches, where 5 just seems bulky.

Before I do too much more on the background, I need to make some decisions on the tree and his feet. The stitch guide calls for long and short stitch on the tree, but I don't know if that will work. Unfortunately, the picture of the original shows so many ornaments on the tree that I can't tell how it was stitched. I'm going through some stitch books to see if I can find some alternatives to long and short, but I definitely think my Santa will be carrying an undecorated tree. I'm not sure why Santa would carry a tree at all, but if he were to do so, why would it be decorated?

As for the feet, my critics here (DH, Mom, and MIL) and I all agree that his feet look, well, feminine. Like ballet slippers. I'm going to play a bit with some photo editing software (or just a paper copy and markers!) to overlay boots on top to see how that would look. I'll just square off the toe, add a bit of a heel, and make the whole thing black or brown. Any other ideas?

****************************************
Pregnancy ticker: 29 weeks, 1 day
Yesterday afternoon, I had an appointment for fetal monitoring (a non-stress test, which measures heartrate and movement). Normally, this appointment, including the car trip, should take less than an hour and a half. Instead, due to a snowstorm that started in the late morning and dumped almost a foot of snow by 5PM, the trip, in total, took three and a half hours. Non-stress, you say? Well, apparently it was all me, because the monitoring looked great.

Oh, by the way, DH suggested an alternative name to "TK" ("The Kid"), which he never really liked anyway. So now, we're referring to the baby as "BJ", short for "Bundle of Joy". :-)

Monday, December 15, 2008

Santa's Toys

When I started stitching the toys on Joan Thomasson's Celebration Santa, I just jumped right in. I very quickly realized that I'd be stitching over some of the details and going back to fill them in - with no knowledge of what I was going to be detailing.

It was then that I remembered one of the golden rules of stitching painted canvases: Make a copy first! I don't know why I didn't think of it initially. I regularly read the blog of Jane of Chilly Hollow (painted canvas stitcher extraordinare), and she always makes a copy of her canvases before stitching. Well, better late than never, and I figure a photo is just as good as a copy. So, with just the blue of the doll's dress stitched, this is the "before" picture.

The toys were mostly stitched in basketweave, with a few french knots for eyes, straight stitches for the horse's mane and tail, and backstitches for details as needed. I didn't do the doll's mouth yet. I'll catch that when I'm stitching Santa's coat.

I made one change from the stitch guide: rather than stitching the doll's hair in orderly rows of french knots, I gave her "sausage curls" in bullion knots. These were fun (yes, I actually enjoy the challenge of bullions), worked up quickly, and give a bit of dimension.

I also stitched the drum, which worked up quickly compared to all of the basketweave. It just uses satin stitches for the triangles and some couched metallic for the rim.

I love the way the toys came out, and I'm very glad I stitched them before stitching the brown of Santa's bag or the red of his coat. Now I can do those large areas without worrying that I'm stitching over a detail needed to bring the toys to life!

Thank you Jane, for your advice! I have other things to thank you and others for, but that's another post!

**********************************
Pregnancy ticker: 28 weeks, 3 days.
Santa's keeping me occupied, so I'm not going crazy (or overdoing it) yet!

Friday, November 30, 2007

Acorns and an ornament

Hooray! I finally finished reweaving the nut portion of the acorns.

The frogging went a little easier tonight, since I just cut out the old parts. After talking with my MIL, I discovered that I didn't need to worry about running out of thread. MIL and I both started this piece in a class together, and a few weeks after the class ended, one of the stitchers realized we would likely run short of this thread. The teacher (who owns a nearby shop), provided extra balls of pearl cotton to each person in the class. MIL picked up one for me, and I know she gave it to me. Can I find it? Nope. I've looked everywhere. However, she has both of her balls of pearl cotton, and is letting me take what I need from one of them so I can finish this piece! Thanks Mom!

On another note, I'd like to share something that I picked up from the finisher a few weeks ago. Here is the First Christmas ornament I made for my cousin's little girl. The hand-painted canvas was by Kathy Shenkel. It came out a bit oddly-shaped, because the heel of the stocking is almost as large as the toe. This wasn't that obvious in the original canvas, but it's evident now since it's been stuffed. I'm still pretty pleased at how it turned out.

And last, but certainly not least, today marks the END of NaBloPoMo! Posting every day for a month was difficult at times, but overall I've enjoyed it. I can't say I'll post quite as frequently going forward, but this experience has forced me to think about possible blog topics as I go through my day. Hopefully it has become a bit of a habit, and my posting may be a bit more regular than it was before this month. As for this weekend, though, I'll probably post a monthly recap and goals tomorrow, and then take Sunday OFF from blogging - just because I can! :-)

Saturday, September 22, 2007

First Christmas ornament

Last night, I finished up the front of the ornament for my cousin's daughter.
This is the first painted canvas I've done without a stitch guide or help from a teacher to start me off. So, what stitches did I use?

I have everything but the cuff done on the back, too. Before I finish it, I have to make sure I have the baby's name spelled right! I should be able to check on this at the family reunion today.

Thanks to Kathy Schenkel for such a fun canvas! I enjoyed figuring out how to stitch it.

Wednesday, September 12, 2007

Another busy week

Sorry for not posting much this week. For maybe the fourth time in a year, both EGA and ANG meetings fell in the same week! So I had EGA on Monday, ANG tonight, and the LNS stitch night tomorrow.

I've been working on the canvas for my cousin's daughter, which I started on the plane to Vegas. In case you're wondering, the canvas is one of Kathy Schenkel's First Christmas canvases. You can see it on this page of Kathy's site. It's number CO301, and I should be done with the stitching by Saturday or Sunday.

If you haven't explored Kathy's site, you're in for a treat. Her canvases are so much fun! My LNS has had her trunk show in each of the last two years, and it's always difficult to choose only one or two! :-)

Monday, July 16, 2007

Sharon G. class, Day Two

As I mentioned, in the second day of class, we all started stitching on our canvases. (If you're just tuning in, I'm doing Sharon's Tuscan Spring.)


I spent most of my time working the first lavender bush (yes, those are lavender bushes in the foreground!) with knots. Sharon calls them "sloppy french knots", but I prefer Carole Lake's description of "sloppy wrapped knots", since a true french knot only has 1 or two wraps, depending on whose definition you use! These sloppy knots have anywhere from 2 to 8 wraps. Most of mine had 3-5 wraps on them. I used a variety of solid and overdyed lavender threads, blending various combinations of two strands in the needle.

When I got tired of making knots, I moved on to the foreground hillside. I used a stitch that's a combination of burden stitch and double brick stitch. Essentially, a double brick stitch (over two threads) is used to couch a length of thread along the row. I used one strand of overdyed floss in green and brown. After I got a few rows in, I decided this thread has too much green in it, so it looks like I'm overlaying a green screen on top of the painted canvas. I'm going to rip this part out and replace it with another color. Sharon suggested Gloriana's Pecan.

It was getting late when I discovered I was wasting my time on the hillside, so I just started the cream-colored tent stitches around the windows of the house.

Sharon also reviewed the Mindy canvas with me. It made me feel a little less clueless when she really had to think about the canvas before sitting down with me! She provided a number of great ideas, and I wrote them all down for the eventual stitching of this canvas.

Saturday, July 14, 2007

Sharon G class!

Wow! Day 1 of the Sharon G. class in canvas embellishment is over. I learned soooo much, and am completely wiped out! As one of my comrades said at lunchtime, "I can't listen fast enough!" And the weird part is, not one of us put a single stitch into our canvases - we just talked through all of them.

Tomorrow, we'll start to stitch, and ask questions as we go along. I'm planning to bring the Mindy canvas I spoke of a few weeks ago, because I'm still fairly clueless on what to do with it.

Sharon, if you're reading this, thanks for a completely wonderful, exhausting day! It was fun to try to keep up with you!

Friday, July 6, 2007

Startitis!

On Sunday, I finished all but the gold couching on the Kimono. I finally decided to use encroaching gobelin (1x2) for the blue flowers, then it was on to the gold! Upon reading a bit about couching in traditional Japanese embroidery, I realized I had to get a pair of koma. These are used to help control and direct the threads being couched, which are fairly lightweight and don't want to stay in one place without help! So, what's a girl to do when she can't progress with the current project when the LNS is closed? Start something new, of course! :-)


I've had Fantasy Remembered, an EGA group correspondence course by Luan Callery, waiting in the wings for a while. I traced the design on the fabric months ago! I've been hesitant to start it because it's stumpwork, and while I want to get better at non-counted work, I'm an engineer, so the exactness of counted work appeals to me! Anyway, I found I had the correct size stretcher bars, and got to work mounting and lacing the fabric as specified in the course directions.

The instructions are broken down by "sessions" for those groups that will be meeting monthly. Since I'm taking this through the CyberStitchers chapter of EGA, we don't have sessions, and we're on our own except for the Yahoo! group set up for the class. The first session consisted of working the stems in outline stitch and the tendrils in coral knot stitch, using Medici wool. I must be getting more comfortable with non-counted work (thanks to the goldwork hearts, perhaps?), because I actually enjoyed working this, and wasn't completely stressed out about it being perfect! I only occasionally had to repeat my motto: "It's just string... it's just string".

I finished session 1 in only a few days (I'm on vacation!), and have since moved on to session two - the flat and wired leaves. I've started the leaves on the ground fabric in outline stitch with 1 strand of floss. This is a bit more frustrating because the floss does not plump up as much as the wool, and is somewhat less forgiving, but I'm making progress!

Moving on... In the past week, I've made a few purchases. Last Thursday at the LNS, I came across Hillside Samplings' Be You to Others Sampler, and had to pick it up! Also, MIL and I went to a not-so-LNS on Tuesday! I purchased a new tote bag, some more Japanese gold for the kimono, and four sampler charts.

Yesterday, knowing that it was stitch night at the LNS, I thought about what I would take to stitch. I realized that both the kimono and the stumpwork would take a bit more concentration than a group stitch-in would allow. So, ignoring the many other already-started projects, I decided that I needed something fairly simple. (Note - I did not say small. I don't do too many small pieces!) So, I looked at my new sampler charts, picked one that was mostly cross stitch and would fit on one of the fat quarters I had, and could be started with threads from the stash! (You can see why this post is labeled Startitis!)

I chose the Be You to Others Sampler. This is probably the last time I'll call it that. When the ladies and I were looking at the chart last week, we noted the disproportionate size of the various elements in the picture. This was common to samplers in the nineteenth century, and while this isn't a reproduction, it has a historical feel. In particular, we noted that the squirrels under the tree on the left were nearly as big as Adam and Eve under the tree on the right, and were pretty tall in relation to the house. They almost immediately were dubbed "Teenage Mutant Ninja Squirrels", so this piece is now destined to be known as the Ninja Squirrel sampler amongst my stitching friends!

And so, the Ninja Squirrel sampler was started last evening. I'm using a 36ct linen from Lakeside in a limited run color. I received it as part of the fabric of the month club from Silkweaver a few years ago. The color is a light warm brown, though it's hard to see in the picture due to the camera flash. I'm using a single strand of silk over two, and found sufficient colors of Vikki Clayton's Hand-Dyed Fibers in my stash to at least start the border to make sure the fat quarter was going to be wide enough. The fabric is 18" wide, and the sampler is almost 14" on the 36ct. I started in the middle of the border, and ran it past the LNS owner/framer to make sure it was frameable. I didn't want to stitch more than needed and then find out I was wasting my time!

My apologies for the (really) long post, but I've been stitching a lot this week!

Friday, June 29, 2007

Kimono background and leaves

The background and leaves are done on my kimono canvas! As I mentioned in my last post about the kimono, the leaves were stitched in basketweave. The red background is stitched in burden stitch with two ply of dark red Accentuate for the couched thread, and 2 ply of red Splendor for the top stitch.


I'm now working on finishing up the flowers. Those that are pink in the middle and white on the outside are being worked in long and short. The white-only flowers are satin stitch across the short direction of the petals (as in Japanese embroidery). I haven't quite figured out what I'm going to use on the blue ones - the one at the bottom and those on both sleeves. I'm thinking of a really lightweight stitch with one ply of silk to let the shading of the paint show through, but I'm open to suggestions!

After the flowers are done, I'll move on to the gold swirls and outlines.

Tuesday, June 26, 2007

Canvas(es) for Sharon G. class

When I first heard that Sharon G. would be visiting our ANG chapter, I immediately thought of a canvas I purchased at Threadneedle Street outside of Seattle. One of the major things I noticed when driving to the shop were that the trees on the hills were so very different from our woodlands in New York state. This canvas is designed by Mindy, and though it was September, not winter, when I purchased it, I knew the evergreens in the piece would remind me of Seattle.

Anyway, I know that since this is an abstract, I have a lot of leeway in how it's stitched, but I don't know how to start. I thought about square Rhodes stitches in the border, but what about those squares that are partially one color and partially another? Variegated threads? What about the trees - just tent stitch, or should I stitch the background over the tree painting, and then add long stitches in for the trees? I could probably find stitches enough for the larger hillside areas, but I'm open to suggestions!

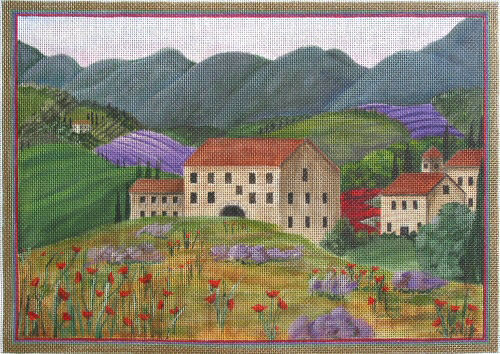
So, I was all set to bring the Mindy canvas to the Sharon G class, but then my LNS owner decided to bring some of Sharon's designs in. I could resist just seeing it on the internet, but in person, Tuscan Spring called to me. I was in Tuscany last May, and this canvas brings the countryside back so vividly! (Although I can't figure out what the purple puffy things are in the foreground. The hills, villas, and poppies I understand, but not the purple puffballs. If you have a guess, please leave me a comment!) Since I have stitched a total of 2 painted canvases (including the in-progress kimono), I am absolutely clueless on how to start this, so I'm going to bring this to the class.

I would appreciate any and all suggestions for either of these canvases!

Thanks again to the website of Needle Nook of La Jolla for the great pictures of these canvases.