Basic detached buttonhole (abbreviated DBH here) is pretty, but most designs don't just use a block of it by itself. Most pieces that use DBH use it to fill specific shapes, such as a flower petal or a leaf. Today's stitch study investigates how to approach such shapes.
In the example, I'm using size 8 pearl cotton on 30 ct linen. I've traced a fairly complex shape with a pencil, but you can just as easily start out with a simple leaf or a rounded petal.
To start, I need to decide the direction of the stitches. I could start with one of the long flat sides, but I don't want the rows of buttonhole at that angle. I really want them going across the petal, somewhat aligned with the fabric weave. That means I can either start at the four points or at the skinny end. To tell you the truth, I'm not really sure how to start at the four points, so I'm starting at the narrow end of the petal.
If your shape is different, think about how you want the stitches to look. For most flowers, you probably want the lines of DBH along the width of the petal. For leaves, you might need to play around to see what direction suits you. I'm going to work through the rest of this study as if you have the same shape, and then go back to try to address other shapes, so stay with me!
 Begin by backstitching around the entire shape. Try to keep the stitch length somewhat consistent, but if it's not perfect, it's not a problem. We're only going to be stitching into the backstitch on the very first row. The rest of the backstitch just works to fill in the color at the edge of the shape.
As in basic DBH, come up on the left side of the area, a bit below the edge you're using as the foundation row. Always begin and end your rows of buttonhole outside the backstitch outline.
 You're then going to proceed as in basic DBH, working into the foundation row of backstitches. In this shape, this means we only have two buttonhole stitches into the two top-most backstitches. Sink the needle on the right side of the area, just outside the outline.
 Come up again on the left side. To fill in my shape, this row needs to be a bit longer than the first, so we're going to need to increase the number of stitches, but just by a little bit. I think three stitches will work fine. In basic
  DBH, we alternated every other row between working into the first leg and then the final leg of the previous stitches. With the shape here, we can work into both the first let and final leg of the previous row and end up with three DBH stitches. Start this row by stitching into the first leg, as in the picture on the right, then into the loop between the stitches, then into the last leg, as in the picture on the left. Sink the needle at the end of the row.
 Because this shape increases gradually and evenly on both sides, we can continue working this way, simply adding another stitch each row by stitching into the first and final legs of previous rows. If you find that it's starting to grow too much, simply don't increase on a row or two. In the picture on the right, I've skipped the first leg, and just started to work into the loops between the stitches.
 In other cases, you'll need to increase by more than one stitch on a row. In such a case, work additional stitches into the first leg or the final leg on the previous row.
  Here, I've made a stitch into the first leg, and, at right, a second stitch into that first leg.
You may be tempted to try to increase in the middle of the row by making two stitches into the same loop between stitches in the previous row. This would disrupt the flow of a traditional DBH shape, but it could produce some interesting effects, like ripples in the shape. If you want to try it, go for it, but if you're trying for a traditional look, keep the increases and decreases for the edges of the shape.
 So, you've worked down to the widest part of the petal, just before it splits into the four points. What should we do now, you ask? The answer is to treat each of these points as a separate shape, and the last full row of DBH as the foundation row for the shape. Come up at the left side of the right-most point, and work into the loops between the stitches of the previous row.
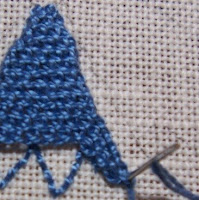 Keep working, filling in the right-most point. In these points, we need to start decreasing the number of stitches. To do this, just neglect to work into the first and last leg as needed. You may find you need to skip a first leg and add two on the last leg to hold the shape. This is completely fine! At the end of the point, make a tacking stitch or two to hold the last row in place.
 When you're done with that point, sink the needle, bury the thread underneath this point on the reverse side, and come up again on the left side of the next point. Work this point the same way.
 Continue working each point until the shape is filled.
If you decided to work a differently-shaped area, the method is the same. Figure out which side of the shape will serve as the foundation row, backstitch the entire shape, and begin working across the foundation row. Try to keep your lines of buttonhole straight. It might be tempting to follow the curve of the petal or leaf, but your stitches will start bunching up in the middle or spreading too far apart.
 The leaf shape on the left was done in my Tudor Purse class with Chris Berry. See how the rows of stitches are straight across the shape? Note where the arrow is pointing. At that point, the third row of stitches has three stitches worked into the final leg of the second row. If you click on the picture, you'll clearly see that there appears to be a tiny gap there where you can see the outline stitch. This really doesn't matter when you realize the entire leaf is really only about 3/4 of an inch across. Nobody's going to be looking at any one leaf on a project that closely. I knew it was there and it took me a few seconds to find it when I went back to it!
On some shapes, you may find that both sides of the shape slant sharply to the left. To fill this, you'll need to increase multiple stitches on the left, and decrease on the right. This is OK. Don't try to pull the rows into the new position. Simply add more stitches to the first leg, and end the row on the right border, wherever it falls. You may need to tack some of the stitches on the right side. (Do I need a picture of this? Please let me know!)
Similarly, if the shape slants sharply to the right, you'll tack a few stitches on the previous row, then start working into the loops of the previous row where it makes sense. Add as many stitches as needed into the final leg of the previous row.
Hopefully you'll now be able to approach various shapes in detached buttonhole without worry. For the next stitch study, we'll learn how to do detached buttonhole with return, which makes a denser stitch with a lighter weight thread.
As always, please let me know if anything in this post needs clarification. I welcome any ideas for future stitch studies. Any type of stitch seen on my blog (counted, surface work, stumpwork, goldwork, canvas stitches, etc.) is fair play.


 Yup. I did it. I started something from my basket. Specifically, I started the Celebration Santa by Joan Thomasson. This canvas came with the stitch guide and the threads, so I didn't have to do any prep work. I started the face on December 4th, at the LNS "open stitch". Santa stayed home while I was in the hospital (though I did have a small project there, of course). Since I've been home, I've been celebrating the holidays the only way I can - by working on Santa while watching Christmas movies on TV.
 I started by filling the entire face with tent stitch in pink (for the cheeks) and flesh tones (for everything else), stitching right over the black eyes and the eyebrows. I went back with a single ply of floss, and with a sharp needle, satin stitched the eyes with white. A french knot in blue-gray silk made up the irises. The white blended in a bit too much, so I outlined the top of the eyes with a single strand of brown floss. I used the same brown to sketch a nose. Bullion stitches in white floss worked well for eyebrows.


